31 December 2014

How Bad is Your Chess?

Some days it is better to read a book than to play chess online. During this morning's online blitz, two minutes and 25 moves were sufficient to complete an appalling loss and an equally appalling victory.

These two games call loudly for a New Year's Resolution to limit blitz.


Internet Opponent (1800) -- Stripes,J (1697) [B41]
Live Chess Chess.com, 31.12.2014

1.e4 c5 2.Nf3 e6 3.d4 cxd4 4.Nxd4 a6 5.c4 Nf6 6.Nc3

Black to move
The Sicilian Kan is good if you understand it.
6...Bc5? 

Wrong square. This move belongs in the "don't try this at home" category. Black should leave the Sicilian Kan in the hands of trained professionals.

6...Bb4 was sensible.

7.Be3 d5? 

What is Black thinking?

7...Qc7 is often made without thinking, and here would be a solid move.

8.e5 Ne4 9.Nxe4? 

If White's plays as bad as Black, the second player might survive.

9.Qg4 applies pressure.

9...dxe4 10.Be2

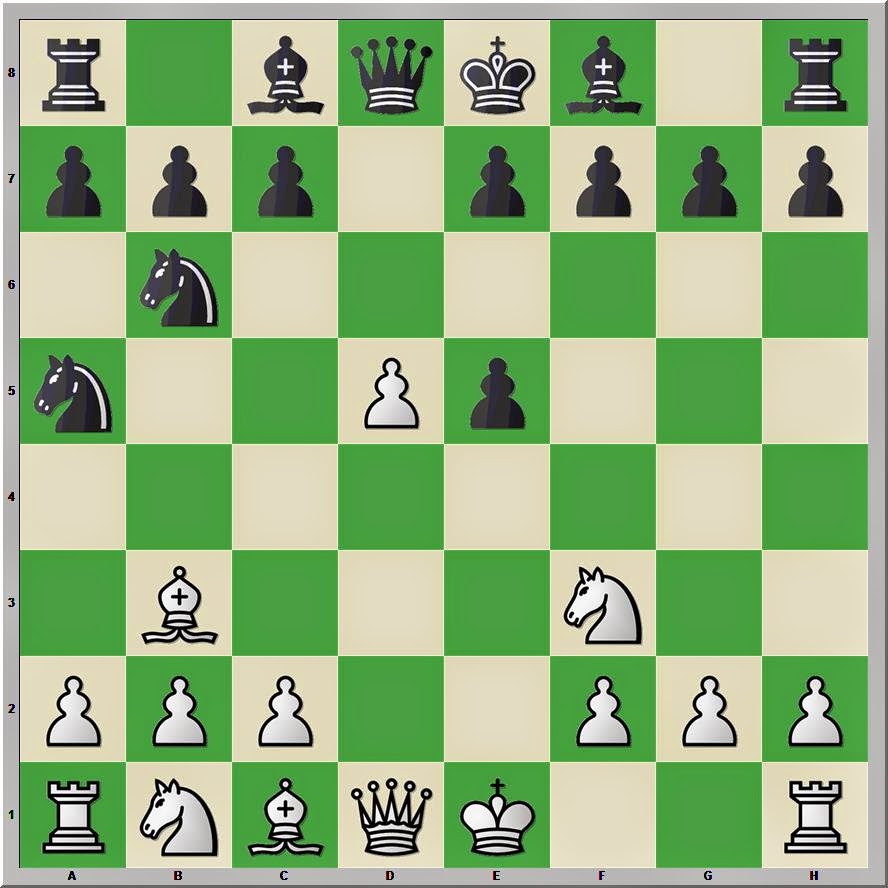
Black to move
The stage is set for a terrible move

10...Nc6??

Free horse! Do not look at its teeth.

11.Nxc6 Qb6

11...Qxd1+ is no better.

12.Bxc5 Qxc5

Making the worst possible move because he doesn't know where the resign button is located.

13.Qd8# 1–0


Stripes,J (1704) -- Internet Opponent (1660) [B04]
Live Chess Chess.com, 31.12.2014

1.e4 Nf6 2.e5 Nd5 3.d4 d6 4.Nf3 Nc6 5.Bc4?!

5.c4 seems normal.

5...Nb6 6.Bb3 dxe5 7.d5!? 

Making the most of prior errors.

7...Na5

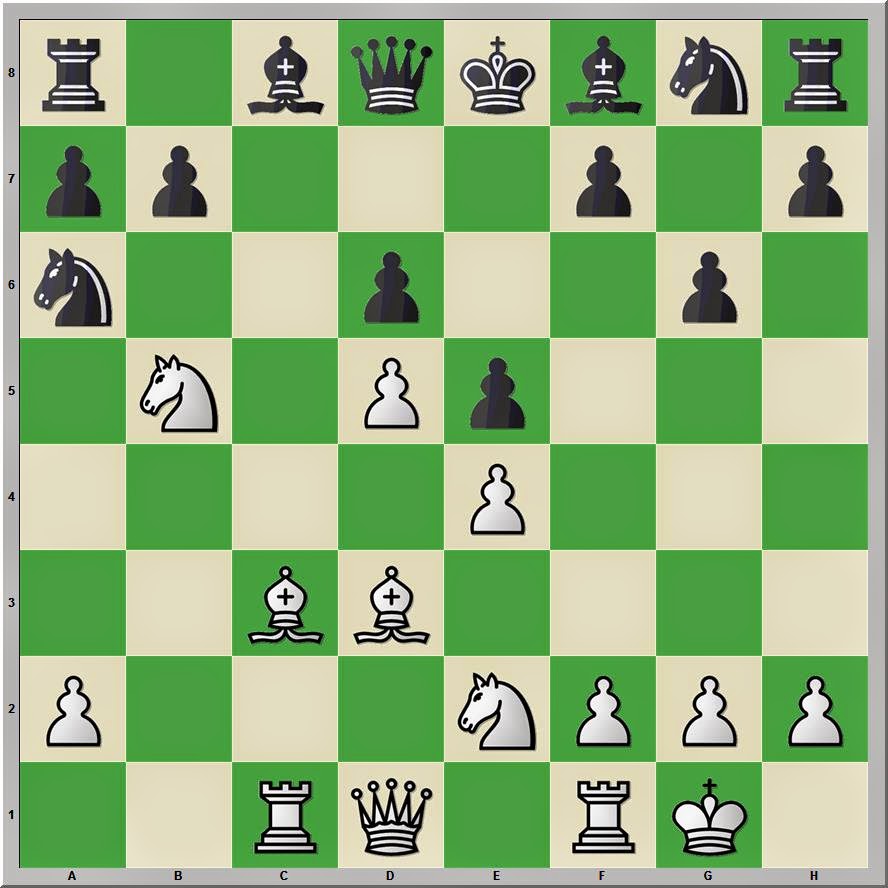
White to move
A position in the database
It may come as a shock that two masters also have found themselves in this position.

8.c4 Nxb3

8...e6 would show White that he has no center.

9.axb3 Qd6 10.Nbd2 g6

Perhaps White's pawns and the weakness of e5 compensate for is temporary one pawn deficit.

11.Ne4

Black to move
"Look mom! The Blind squirrel is hungry."
11...Qb4+??

"Always check, it might be mate."

12.Bd2 1–0

With nowhere to run, Black's queen showed her king where to find the resign button.

30 December 2014

Anderssen -- Staunton 1851

The fifth match game between Adolf Anderssen and Howard Staunton at the 1851 London International Chess Tournament is the source for three essential middlegame positions in Rashid Ziyatdinov, GM-RAM: Essential Grandmaster Knowledge (2000). I have been going through this game for the past few days and now sense that I am ready to post my initial annotations. This game and the one preceding it in Ziyatdinov's text have often slowed my efforts to work through the other games in the text. Staunton's play seems a little amateurish.

Anderssen,Adolf -- Staunton,Howard [C01]
London knockout London (3.5), 1851

1.e4 e6 2.d4 g6?!

This second move is not how the French Defense is played today.

3.Bd3 Bg7

Black assaults d4, attempting to weaken White's center. In this case, at least, Staunton's positional sense is consistent with twenty-first century practice.

4.Be3 c5 5.c3 cxd4 6.cxd4

Black to move

6...Qb6

The fork at the heart of Black's assault on d4. After the same initial five moves, Anderssen, playing Black, opted to continue his development, rather than win a pawn. 6...Nc6 7.Ne2 Nge7 8.0–0 0–0 9.Nbc3 d5 10.e5 f6 1–0 Morphy,P -- Anderssen,A Paris 1858 Morphy won in 35 moves.

7.Ne2 Qxb2 

Black has won a pawn at the cost of moblization of his forces.

8.Nbc3 Qb6 9.Rc1

This move is "well conceived", according to Staunton. Better than the more obvious Rb1, he states. Stockfish disagrees.

9.Rb1 Qa5 10.Bd2 (10.Rb5?! Qd8) 10...Nc6 11.Nb5 Qd8 and a clear advantage for White.

9...Na6

9...Ne7 10.d5 Qb4

10.Nb5 Bf8

10...Ne7 seems better to me. Even so, White already has a nice game.

11.d5 The threat that Staunton identified as rendering Bf8 necessary. 11...Qd8 12.Nd6+ (12.d6 Nc6) 12...Kf8 13.Nd4 -- with the idea of 14.Qf3, attacking the weakness of f7.

11.0–0 d6 12.d5 Qa5 13.Bd4 e5 14.Bc3 Qd8

White to move
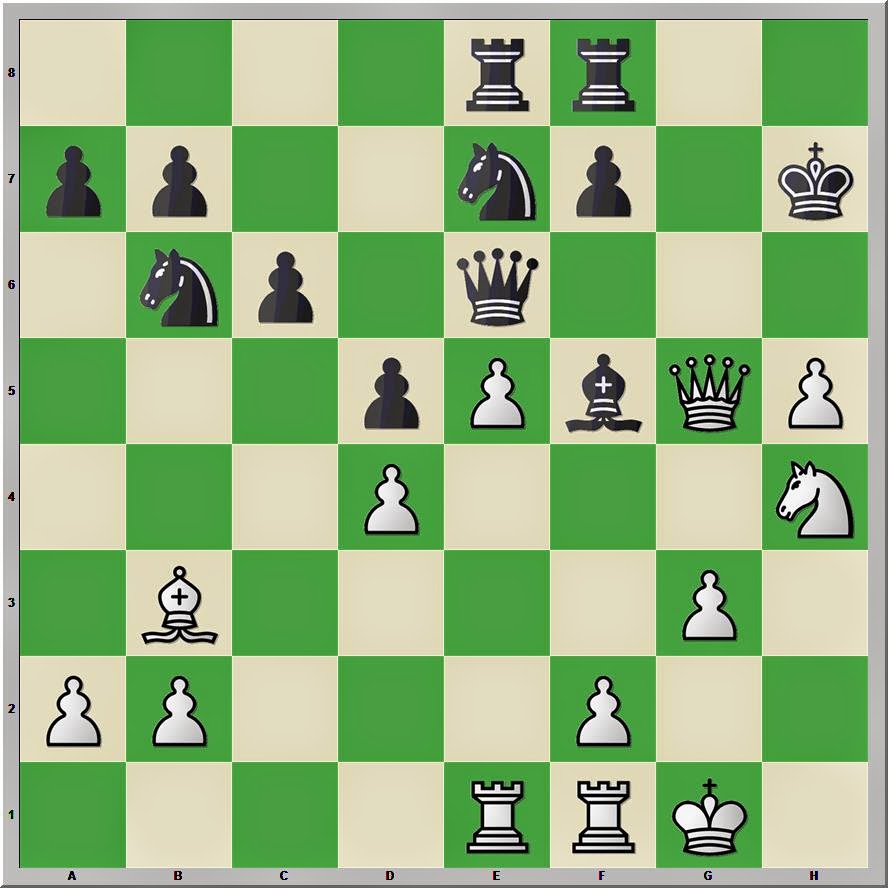
GM-RAM Diagram 140
Only one of Black's pieces is off its starting square. All of White's pieces have moved, except the queen. Although down a pawn, White's pieces are in action.

See "To Know a Position."

15.f4‚ f6 16.fxe5 fxe5

Black's king cannot escape the center, but how will White break through to exploit its vulnerability?

17.Qa4

Beginning the assault on d6 with a threatened discovery.

17...Bd7

Pinning the knight prevents a discovered check, but reduces the defenders of d6.

18.Bb4 Nh6 19.Kh1

White avoids forks that defend d6.

19...Nf7

This position before White's move 20 is GM-RAM diagram 141.

20.Qa3

Black to move

20...Nc5

"Child's play. Throwing away his most important Pawn for nothing!" (Staunton)

I do not agree with Staunton's assessment here.

a) 20...Qe7

Hangs onto a material advantage, but leaves Black's position in shambles.

21.Nxd6+ Nxd6 22.Rxf8+! Qxf8 23.Bxd6 White's position is very strong.

b) 20...Qb8

Fails to bolster the pawn.

b1) 21.Rxf7!? Kxf7 22.Bxd6 (22.Nxd6+ Kg8 23.Bxa6 bxa6 24.Ng1 with compensation for the material) 22...Bxd6 23.Nxd6+ Kg7 24.Nxb7! Rc8 25.Qe7+ Kg8 26.Rb1+-

b2) 21.Rf6! is the computer's choice.

c) 20...Be7

Black's best choice, although it does not retain the pawn.

21.Nxd6+ (21.Bxd6? 0–0) 21...Nxd6 22.Bxd6 Bxd6 23.Qxd6 Qe7 24.Rf6 and White's position seems better.

21.Nxd6+

Better is 21.Bxc5 dxc5 22.d6 and White must regain the pawn with interest. 22...Nxd6 23.Qxc5 (23.Rxf8+!? Kxf8 24.Nxd6‚) 23...Nxb5 24.Qxe5+ Qe7 25.Qxh8 White is up the exchange and Black's king remains stuck in the center.

21...Bxd6 22.Bxc5 Bxc5 23.Qxc5 Qe7 24.Qc7 Nd6 25.Qa5 h5 26.Rc7 Rf8 27.Rfc1 a6

White to move
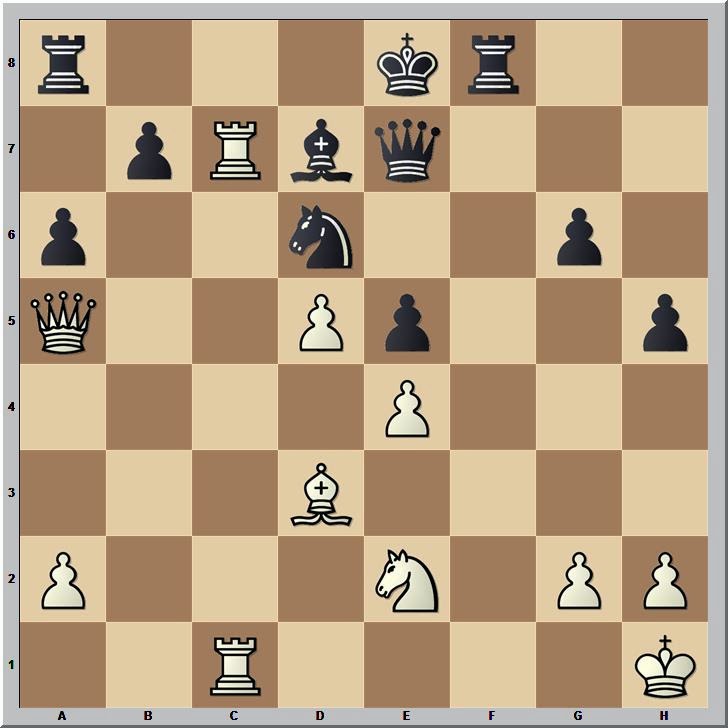
GM-RAM Diagram 142
28.Nd4! Rc8

28...exd4? Staunton observed that taking the knight would be an error. 29.e5 Nf7

(29...Qxe5 30.Bxg6+ Nf7 31.Re1 White will win material of greater value than the knight ... and the assault on Black's king will continue.)

30.e6 Nd6 31.exd7+ Kf7 (31...Kd8 32.Rc8+ Kxd7 33.Qc7#) 32.d8N+ Rfxd8 33.Rf1+ Nf5 34.Rxe7+ Kxe7 35.Bxf5+-.

29.Ne6

"At this crisis, the game, having lasted several hours, was postponed by mutual consent until the next day." Howard Staunton

Staunton notes that White has a clear advantage.

29...Rxc7 30.Rxc7 Rf7 31.Qb6

Fiddling around is search of the most precise moves, I looked through these variations. Neither of them seem superior to Anderssen's choice.

31.Qc3 Nb5 32.Bxb5 axb5 33.h3.
31.Nc5 Qf6 32.h3

31...Rf6 32.h3 g5 33.Qb2 Nb5 34.Bxb5 axb5 35.Qxe5

Black to move

White finally has a material advantage.

35...h4 36.Rxb7 Rf1+ 37.Kh2 Qf6 

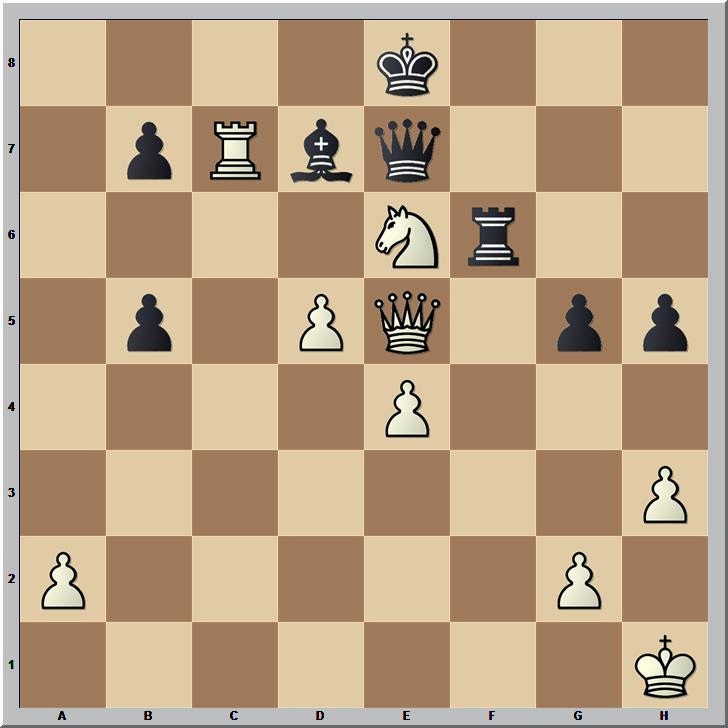
White to move

White has a mate in six.

38.Rb8+

The game ends more rapidly after 38.Qb8+ Kf7 39.Rxd7+ Qe7

(39...Kg6 40.Qg8+ Kh5 41.Qh7+ Qh6 42.Ng7#)

40.Qf8+ Kg6 41.Qxe7 Rh1+ 42.Kxh1 b4 43.Qxg5#.

38...Ke7

a) 38...Bc8 39.Rxc8+ Kf7

a1) 39...Kd7 40.Qc7#.
a2) 39...Ke7 40.d6+ Kd7 41.Rc7+ Ke8 42.Ng7+ Kf8 43.Qe8#.

40.Rf8+ Kg6 41.Rxf6+ Rxf6 42.Qxg5+ Kf7 43.Qg7+ Ke8 44.Qxf6 b4 45.Qf8+ Kd7 46.Qd8#.

b) 38...Kf7 39.Rf8+ Kg6 40.Rxf6+ Rxf6

b1) 40...Kh5 41.Ng7#.

b2) 40...Kh7 41.Qxg5 Rh1+ 42.Kxh1 Bxe6 43.Rh6#.

41.Qxg5+ Kf7 42.Qg7+ Ke8 43.d6 Rxe6 (43...Bxe6 44.Qe7#) 44.Qg8#.

39.d6+ Kf7 40.Rf8+ Kg6 41.Rxf6+ Rxf6 42.Qxg5+ Kf7 43.Qg7+ Kxe6 44.Qe7# 1–0


29 December 2014

To Know a Position

300 Positions

Rashid Ziyatdinov, in his provocative GM-RAM: Essential Grandmaster Knowledge (2000), builds on an idea that has been put forth by others: knowing well a set number of critical positions is essential to chess strength.*
In Russian chess folklore it is said there are 300 positions which comprise the most important knowledge which an aspiring player must acquire. (12)
Ziyatdinov continues with the recognition that several sets of 300 positions have been presented by other authors, that the collections vary, and that opinions "vary regarding which positions comprise the magical 300". He cites Lev Alburt, Chess Training Pocket Book: 300 Most Important Positions & Ideas (1997).** Alburt claims that his 300 positions will provide a foundation for becoming a "strong tournament player" (8). Ziyatdinov makes a more ambitious claim:
Assuming understanding of the strategy, openings, and of chess tactics, a student who knows every position in this book "by heart" ... will achieve Grandmaster status. (13)
I shall return in a moment to the important qualifications marked by the ellipses in this quote.

Both Alburt and Ziyatdinov employ computing metaphors in their work. Alburt refers to the 300 positions as "zipped files". Each contains "volumes of chess playing knowledge" that can be assessed via the "programs" of a player's "problem-solving skills" (9). Ziyatdinov, on the other hand, does not present the information as locked up and needing access by a special program. Rather, the essential positions are "tacit knowledge" akin to basic words in one's native language.
When using information in its RAM memory, a computer works more than 100 times faster than when using information from its hard drive. (7)
While Alburt presents positions that will be stored at the back of one's memory, Ziyatdinov asks that students know the position cold, "such that in a matter of seconds he or she understands everything important about the position" (13). Part of the knowledge of a position is memorization of the game from which it comes. Positions are "the fingerprint of the games" (77).


Anderssen -- Staunton 1851

Ziyatdinov's positions include 133 endgame positions and 120 middlegame positions (three positions are duplicated because Ziyatdinov discusses them). He leaves it to the reader to fill in the gap to bring the total to 300. The 120 middlegame positions stem from 59 games. Three positions are from the fifth match game between Adolf Anderssen and Howard Staunton at the First International Chess Tournament 1851. The diagram below is the first of these three.

GM-RAM, Position 140
What must I know about this position?

The moves leading up to it featured a queen sortie that netted Black the pawn on b2. Then the queen was driven back to her starting square. Black's dark-squared bishop also left its initial square, but then returned in an unsuccessful effort to keep the queen in play.

Staunton's annotations in the tournament book of the First International Chess Tournament explain his reasoning when he played 10...Bf8. I think that 10...Ne7 would have been better, although even then White already had a clear advantage.

I have been going through this game repeatedly over the past few days. After 14...Qd8, which led to the diagram position, I wrote:
Only one of Black's pieces is off its starting square. All of White's pieces have moved, except the queen. Although down a pawn, White's pieces are in action.
Black's lack of development is certainly one element that makes this position notable.

Over the course of the next few moves, Anderssen put pressure on the weak backwards pawn on d6. After 20...Nc5, Staunton wrote, "Child's play. Throwing away his most important Pawn for nothing!" The only way that I have found for him to retain this pawn leaves his position utterly hopeless, although he maintains a material advantage. White still gains the pawn, but sacrifices the exchange (rook for bishop) in order to do so.

Looking Toward 2015

I am ambivalent concerning any chess related New Year's Resolutions for 2015. My resolutions for 2013 were only partly successful and ended in disappointment. The year before, I met my rating goal but not my training goal. I did not bother in 2014.

Nonetheless, I am presently inclined to make an effort to work through one game per week from GM-RAM. How far into 2015 this current interest will carry me is unknown. I suspect that at some point other training interests or non-chess priorities will intervene and break me from this path. That is what always happens.

I cherish no illusions that I will attain Grandmaster strength. Even USCF Expert seems a long shot in the light of my current playing strength and tournament opportunities. I spend a lot of time on chess, but the bulk of this time is divided between the thrill--positive and negative--of online blitz, on the one hand, and nurturing the skills of children, on the other hand. I am privileged to coach several of the area's top elementary players. I am applying some of Ziyatdinov's training ideas in this coaching, using a batch of Paul Morphy's games (see "Morphy's Fingerprints"), followed by the eleven Anderssen games in GM-RAM.

Whether for my own progress, or for that of my students, the time that I invest studying Ziyatdinov's 59 games should prove beneficial.

I might also spend more time plowing through the 133 endgame positions in GM-RAM. The six positions in "Six Pawn Endings" are essentially identical to the first six in the book. These have been among the fundamental positions that I have been teaching youth players since even before I bought Ziyatdinov's book. In his 133 positions, however, are quite a few that I have yet to invest any serious time. Perhaps that will change in 2015.


*My initial review of this book is available at "GM-RAM: Essential Knowledge." Subsequent ruminations appear by clicking with the label "Ziyatdinov" below.

**Since the publication of GM-RAM, Alburt has brought out a second book with an additional 320 positions, Chess Training Pocket Book II: 320 Key Positions for Players at All Levels (2008).

24 December 2014

Middlegame Novelty?

Cranking my way through games in old Chess Informants, I thought that one particular game seemed familiar. Indeed, Psakhis -- Pomes, Groningen 1990 (CI 50/304) followed Huebner -- Nogueiras, Barcelona 1989 (CI 47/343) until move 23.

White to move

Psakhis played 23.Rb6!

Huebner had played 23.c3 and Nogueras found a stalemate resource at move 41.

Black to move

Heubner avoided the stalemate, but the game was agreed drawn five move later.

21 December 2014

Pawn Wars

In a game played ten years ago, Sergei Rublevsky had a one pawn advantage.

White to move

He played 33.Rxd5!

A forcing sequence resulted. 33...Bxd5 34.Bxd5 Kf7 35.Re1 Raa6 36.Kg1 Ke7 37.Rxe6 Rxe6 38.Bxe6 Kxe6

White to move

Rublevsky was able to win the pawn ending. The game was published as Chess Informant 91/236.

20 December 2014

An Unplayed Brilliancy

This was a betrayal of myself.
Mikhail Tal
There is a line of the Alekhine Defense in which the Black king strolls towards the center after White's knight sacrifice. The line resembles the Fried Liver Attack, but is more often played by Grandmasters.

In one game, Bent Larsen defended the Black side well and won a nice miniature against Mikahil Tal. In another game, Tal worked out the variations all the way to checkmate before sacrificing the knight. The Black king was driven to a1 where it was checkmated with White's few remaining pieces.

These games are fantasy variations that stem from a war of nerves in which Larsen scored an important victory against the master of attack, but still lost the Candidate's Match against the former World Champion. Tal spent fifty minutes contemplating the knight sacrifice, trusted his opponent's preparation, and opted for a safer route. He ended up in a worse position, but managed to salvage a draw in the endgame.

My interest in this line was provoked by Yasser Seirawan's excellent recent lecture at the Chess Club of Saint Louis, "A History of Chess Openings". Near the end of the lecture, Seirawan indicates that he may have mixed up the moves of Tal -- Larsen, but goes on to make some astute comments concerning opening preparation. He had spent several days been looking at "the conservative and the super sharp lines" of this opening. Tal's trapped queen and another quieter game he showed first illustrate the possible varieties. Seirawan predicts that the Alekhine Defense, like the early queen exchange in the Berlin Defense, could become a new hot trend in Grandmaster play.

Here is the game that Seirawan remembered.

Tal,Mikhail -- Larsen,Bent [B04]
Candidates Semi-Final Bled (4), 1965

1.e4 Nf6 2.e5 Nd5 3.d4 d6 4.Nf3 dxe5 5.Nxe5 Nd7

Larsen offered Tal an opportunity to drive his king to the center with a knight sacrifice.

6.Nxf7 Kxf7 7.Qh5+ Ke6 8.c4 N5f6 9.d5+ Kd6 10.Qf7 Ne5 11.Bf4 c5

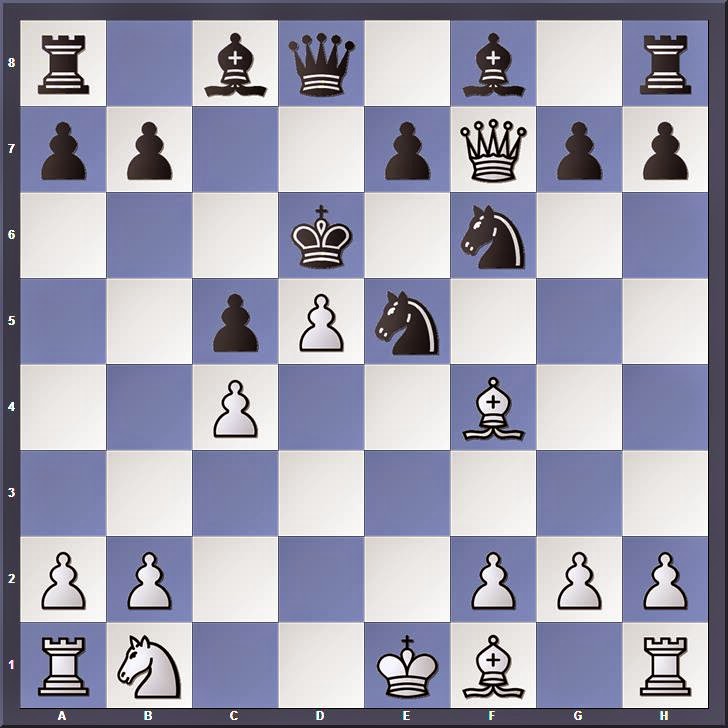
White to move

12.Nc3

12.b4 is the main line in my edition of Encyclopedia of Chess Openings.

12...a6 13.0–0–0

See the next game for 13.Rd1

13...g5 14.Bg3 Bh6 15.Re1

Seirawan does not offer 15.d6, which has been played in similar positions (after 13...g6 and no 14.Bg3).

15...g4+ 16.Kb1 Bf5+ 17.Ka1 Rf8 18.Bxe5+ Kd7

White to move

Unable to rescue his queen, it is time for White to resign.

0–1

In Attack with Mikhail Tal, trans. Ken Neat (1994), Tal explains his thinking after Larsen's shocking 5...Nd7.
My intuition insistently kept telling me that the sacrifice had to be correct, but I decided to calculate everything "as far as mate", spent some 50 minutes, but then in one of the innumerable variations I found something resembling a defense, and ... rejected the sacrifice. This was a betrayal of myself, I saved the game only by a miracle after the adjournment.

Here is the variation that Tal presents in the opening section of his book.

Tal,Mikhail -- Larsen,Bent [B04]
Candidates Semi-Final Bled (4), 1965

1.e4 Nf6 2.e5 Nd5 3.d4 d6 4.Nf3 dxe5 5.Nxe5 Nd7 6.Nxf7 Kxf7 7.Qh5+ Ke6 8.c4 N5f6 9.d5+ Kd6 10.Qf7 Ne5 11.Bf4 c5 12.Nc3 a6 13.Rd1 g6 14.Bxe5+ Kxe5 15.d6 g5 16.Rd2 Bf5 17.Re2+

Black to move

17...Kd4 18.Re4+ Bxe4 19.Qe6

Black to move

Perhaps the defense that he found in his calculations was 19...Qd7, covering h3 or 19...Qb6, covering b3.

White's threat, according to Tal is 20.Ne2+ Kd3 21.Qh3+ Kc2 22.Qb3+ Kb1 23.Nc3+ Ka1 24.Bd3 Bxd3 25.Kd2+ Bb1 26.Rxb1# 0–1

Here is the game that was actually played.

Tal,Mikhail -- Larsen,Bent [B04]
Candidates Semi-Final Bled (4), 1965

1.e4 Nf6 2.e5 Nd5 3.d4 d6 4.Nf3 dxe5 5.Nxe5 Nd7 6.Bc4

Black to move

6...e6 7.Qg4 h5 8.Qe2 Nxe5 9.dxe5 Bd7 10.0–0 Bc6 11.Rd1 Qe7 12.Nc3 Nxc3 13.bxc3 g6 14.a4 a6 15.Rb1 Qc5 16.Be3 Qxe5 17.f4 Qf5 18.Bd3 Qg4 19.Qf2 Be7 20.Bd4 0–0 21.Be2 Qf5 22.Bd3 Qg4 23.Be2 Qh4 24.g3 Qh3 25.Bf3 Rad8 26.Bxc6 bxc6 27.Be5 Qf5 28.Qe2 Bd6 29.Rd3 Bxe5 30.fxe5 Rxd3 31.cxd3 Rd8 32.Rd1 c5 33.c4 Qg4
White to move

34.Qxg4 hxg4 35.Kf2 Rb8 36.Rd2 Kg7 37.Ke3 g5 38.d4 Rb3+ 39.Kf2 cxd4 40.Rxd4 Kg6 41.Rxg4 Rb2+ 42.Kg1 Kf5 43.Rd4 Kxe5 44.Rd7 f5

White to move

Black must be better here with an active king and a pawn majority on the kingside.

45.Rxc7 Ke4 46.Rd7 Rc2 47.Rd6 e5 48.h4 gxh4 49.gxh4 Rxc4 50.h5 Kf3 51.Rd3+ Kg4 52.h6 Rc7 53.Rd6 e4 54.Kf2 a5 55.Rg6+ Kh5 56.Ra6 f4 57.Re6 Rc2+ 58.Ke1 Rc1+ 59.Kd2 Rh1 60.Rxe4 Kg4 61.Re6 Kg3 62.Rf6 f3 63.Ke3 Re1+ 64.Kd3 Re7 65.Rg6+ Kf4 66.Rf6+ Kg3 67.Rg6+ Kf4 68.Rf6+ Kg4 69.Kd4 Kg3 70.Rg6+ Kh3 71.Rg7

Black to move

71...Rxg7 72.hxg7 f2 73.g8Q f1Q 74.Qe6+ Kh4 75.Kc5 Qb1 76.Qc4+ Kg3 77.Qc3+ Kf2 ½–½

All three games are instructive. This is as true of the game played as of the two unplayed fantasies.

18 December 2014

Six Pawn Endings

Lesson of the Week

Thinking that my top students had already mastered these elementary endings, I put them before a couple of students this week as a quick review. It turns out to have been a good thing to review because not every student quickly knew the correct answers. Each diagram is two positions--White to move, and Black to move.

Most of my beginning students this week confronted the first diagram with White on move. First, they needed to assure the pawn became a queen, then they needed to checkmate me.


17 December 2014

Morphy's Fingerprints

...from this fingerprint, the associated game can be identified.
Rashid Ziyatdinov, GM-RAM
Since mid-summer, a handful of my students have been slowly working through eighteen games played by Paul Morphy. I printed the scores for all of his games from the First American Chess Congress 1857. These game scores become part of the work my students and I go through during our time each week. I encourage them to go through the games as homework, too. They have other chess homework to which they usually give priority--problem sets from my "Checklist of Checkmates", for example, and the problem sets I call "Checkmates and Tactics".*

As we go through the games, we look for critical positions, the key decisive errors, and improvements for both sides. My own understanding of these games is informed by annotations of some of them in Valeri Beim, Paul Morphy: A Modern Perspective (2005), which has been in my chess teaching bag most of the past several months. In a few instances, my students and I also have looked at Philip W. Sergeant, Morphy's Games of Chess (1957).

Two of my students have been through all eighteen of Morphy's games from the American Chess Congress and are now working through a small selection of Anderssen's games, those selected by Rashid Ziyatdinov for inclusion in GM-RAM: Essential Grandmaster Chess Knowledge (2000). Ziyatdinov's 120 middlegame positions all occur in the 59 games that he includes in the book. Ziyatdinov advocates mastery of 300 positions, but includes only 256 in his book. He states that each individual will have his or her own additions to the list.

I am now assembling diagrams from these eighteen Morphy games. These diagrams, like the middlegame positions in GM-RAM, are fingerprints that should provoke recollection of the entire game from which each is extracted. My students have not yet set out to memorize Morphy's games, but each of these positions should be reasonably familiar. We discussed each one in some detail. In some cases, the position is where Morphy's tactical skills led him to a decisive blow. In other cases, they represent the moment where his opponent began to self-destruct. In one case, Morphy missed the best plan.

In each case, the idea of the diagram is to understand how both sides should play the position. Is the position one of equality or does one side have a clear advantage? The first set of four positions are from Morphy's three games against James Thompson, his first round opponent at the American Chess Congress.

Perhaps these are not the most important positions from these three games. Perhaps there are better fingerprints.

White to move

White to move

White to move

Black to move

I will select positions from the remaining fifteen games at a later date.


*An award certificate structured curriculum gives structure to many of my lessons with students receiving individual instruction and school clubs. Students work through "Checklist of Checkmates" as part of the Bishop, Rook, and Queen Awards. There are seven sets of problems for a total of 139. The "Checkmates and Tactics" worksheets begin with six checkmates in one move for the Pawn Award and culminate in sixty problems, only a few ending in checkmate, for the Queen Award. There are 150 problems in five sets.

15 December 2014

Elementary Rook Ending

In this diagram, if it is White's move, it is an elementary Lucena Position. But what if is is Black's move?

Black to move

13 December 2014

Mate in Ten

In the International Chess Tournament, London 1851, Adolf Anderssen prevailed over all of his opponents. Through play of casual games, he and József Szén determined that one of the two of them would win the event. The two met in the second round, which Anderssen won 4-2. This position occurred in the fourth game of their match. Anderssen won the game with a strong attack on Szén's king. However, his play was far from perfect.

Anderssen missed a forced checkmate in ten moves.

Black to move

It should not come as a surprise that this position is one of two from this game that appears in the "Essential Middlegame Knowledge" section of Rashid Ziyatdinov, GM-RAM: Essential Grandmaster Chess Knowledge (2000).

12 December 2014

An Unsound Sacrifice?

In a game that permitted too little time for thinking. I gave up a knight to expose my opponent's king. As is the norm in blitz, we both misplayed the continuation.

This position arose via the Ponziani.

Stripes,J (1792) -- Internet Opponent (1832) [C44]
Online Chess Site, 12.12.2014

White to move

28.Nxg5!?

28.Nh2 is objectively better.

28...hxg5 29.Qxg5+ Kh8? 

After 29...Kh7 30.Nh4 Rg8 31.Qf6 Nc4 32.Qxf7+ Rg7 33.Qf6 Bd3 34.e6 Qd6 35.h6 Rgg8 36.Qf7+ Kh8 37.Qf6+= White can abandon his lunacy with a perpetual.

White to move

30.Qf6+

30.g4! Bxg4 31.Qf6+ Kh7 32.Bc2+ Bf5 33.h6 Rg8 34.Qxf7+ Kh8 35.e6 with continuing pressure. White should win back the sacrificed material and more. 35...Qd6 36.Qf6+ Kh7 37.Bxf5+ Nxf5 38.Qxf5++-

30...Kh7 31.Nh4 Qe6 32.Qg5?? 

32.Nxf5 Nxf5 33.Bc2 Qxf6 34.exf6 Kh6 35.Bxf5+-.

Black to move

32...Rg8 33.Qd2 Nc4 34.Qc1 b5 35.Bc2 

35.Nxf5 was White's last hope for a playable position. 35...Nxf5 36.Bc2 and Black is only slightly better.

35...Bxc2 36.Qxc2+ Kh8–+ 

White is lost, but Black is terribly short on time.

37.b3 Nb6 38.Re3 Nd7 39.Rf3 Rg5 40.Re1 Reg8 41.Ree3 Rxh5 42.Rf4 Black forfeits on time 1–0

11 December 2014

Training with Anderssen

Imbalances are the doorway to planning.
Jeremy Silman, How to Reassess Your Chess, 4th ed. (2010)

In Adolf Anderssen's well-known miniature against Carl Mayet, Anderssen missed the best move. Many ambitious players study this game because it is the first in Rashid Ziyatdinov, GM-RAM: Essential Grandmaster Chess Knowledge (2000).

Mayet,Carl -- Anderssen,Adolf [C64]
London, 1851*

1.e4 e5 2.Nf3 Nc6 3.Bb5 Bc5 4.c3 Nf6 5.Bxc6 dxc6 6.0–0 Bg4 7.h3 h5

The infamous fishing pole.

8.hxg4 hxg4 9.Nxe5

Black to move

9...g3?

9...Nxe4 is clearly winning.

10.d4 Nxe4 11.Qg4?

White needed to play 11.fxg3, when the critical line appears to be 11...Nxg3 12.Re1! Rh1+ 13.Kf2 Qh4 14.Nf3+ Ne4+ 15.Ke2 Qe7 when Black has nothing to show for the sacrificed knight.

11...Bxd4 12.Qxe4 Bxf2+ 0–1

After 9...Nxe4! 10.Qxg4, we have one of the positions that I put in front of a group of scholastic players last week (see "Sacrificial Attack", problem 2). The answer I expected from the students was 10...Bxf2+ 11.Rxf2 Rh1+ 12.Kxh1 Nxf2+ 13.Kg1 Nxg4 and Black has won White's queen, regaining the sacrificed material with interest.

White to move
Analysis Diagram After 13...Nxg4
Of course, White will capture the knight leaving Black with a queen and pawn for three minor pieces.

How should Black then convert the advantage?

14...Qh4 is forcing. 15.Nf2 seems the only sensible move. 14...Qh4 is also the computer's choice.

Starting from the resulting position, I played out the game against Stockfish. I maintained the advantage until White's pieces became active. Then, my position began to deteriorate. Small human errors against a silicon monster eventually concedes the advantage.

I tried the second best move: 14...Qd3

White to move
Analysis Diagram After 14...Qd3
The imbalance that seems easiest to play against is White's underdeveloped queenside.

Rather than frustration stemming from failure against the computer, I quickly provoked the machine's resignation.

Stockfish -- Stripes,J

15.Ne3 f5 16.g3 g5 17.b3 f4 18.gxf4 gxf4

White to move

19.Kf2

I expected 19.Ng2 and planned 19...Kd7 when I have a rook and queen against a knight. Pieces that cannot join the fight are not part of the material count.

19...fxe3+ 20.dxe3 Qc2+ and Stockfish resigned. 0-1


*ChessBase's database has Berlin 1859 for this game, matching how the game is presented in David Levy and Kevin O'Connell, Oxford Encyclopedia of Chess Games, Vol. 1 1485-1866 (1981), 280. However, Levy and O'Connell cite Leopold Hoffer and Johannes Hermann Zukertort, eds., The Chess Monthly 3 (1882), which states the game "was played during the London International Tournament of 1851" (212).

09 December 2014

Lesson of the Week

Most of my advanced students this week will see a position from Anderssen -- Staunton, London 1851. Focus, however, will be upon an unplayed variation. I used a position from late in this game as the week's lesson early in 2014 (see "Find the Best Move").


Anderssen,Adolf -- Staunton,Howard [B40]
London knockout London (3.1), 1851

1.e4 c5 2.d4 cxd4 3.Nf3 e6 4.Nxd4 Bc5 5.Nc3 a6 6.Be3 Ba7 7.Bd3 Ne7 8.0–0 0–0 9.Qh5 Ng6 10.e5 Qc7 11.Rae1 b5 12.f4 Bb7 13.Ne4

Andressen is beginning to build an attack that will punish Staunton for his poor handling of the opening that a century later would begin to be called the Kan variation of the Sicilian Defense.

Staunton decided to eliminate Anderssen's centralized knight with 13...Bxe4. Had he played 13...Nc6, however, how would Anderssen continue the attack? See diagram below.

White to move
Theoretical Position

My beginning students were shown the second position from Saturday's problem solving contest (see "Sacrificial Attack"). After explaining the solution, they were given a worksheet containing the first five problems from January's "Creating Knight Forks". They needed and were given lots of help.

08 December 2014

Problem in the French

The Exchange variation of the French is reputed to give Black easy equality, but it remains a popular choice among amateur players. In a recent online game played at fifteen minutes for the whole game, I quickly found myself in trouble because I was fixing breakfast rather than attending to the game.

Internet Opponent -- Stripes,J [C01]

1.e4 e6 2.d4 d5 3.exd5

The Exchange variation

3...exd5 4.Nf3 Nc6 5.Be2

An unusual move. White's best chance for advantage in the Exchange variation results from vigorous play. This seemingly natural developing move seems too slow.

5.Bb5 and 5.c4 both seem better. Despite my seeming disdain for the Exchange variation, I play it with some frequency. 5.c4 is nearly always my choice here. (See "French Perfume" for harsh criticism of the Exchange variation.)

5...Bd6

Black proceeds with his normal approach to the Exchange variation.

6.0–0 Nge7 7.c4!?

Black to move

This forcing move appears in a mere nine games in the ChessBase database. I have faced it four times in online play. My only loss came as a result of an elementary blunder in the endgame.

7...dxc4

Although nothing else makes any sense, I played 7...Bxh2+ in a blitz game once.

8.Bxc4

Black to move

Black has an important decision to make here.

8...Bg4??

Playing by rote, I blundered.

8...0–0 seems best 9.Nc3 Bg4 10.Be3 Nf5 11.h3 Bxf3 12.Qxf3 Nfxd4 13.Bxd4 Nxd4 14.Qxb7 Rb8 15.Qd5 c6 16.Qe4 (16.Qxd4 Bh2+ 17.Kxh2 Qxd4) 16...Rxb2 with a slight advantage for Black 0–1 Antonov,A (2055) -- Akhmetov,A (2373) Izhevsk 2014 (Black won in 27 moves)

8...Bf5 9.Nc3 a6 10.Re1 b5 11.Bd3 0–0 with a slight advantage for White 0–1 Cook,M (2039) -- Scott,D (2017) England 2013 (Black won in 44 moves)

8...h6 9.h3 0–0 10.Nc3 Ng6 11.Qc2 Nh4 12.Nxh4 Qxh4 13.Qe4 Qxe4 14.Nxe4 and it seems that both players have equal chances 1–0 Kharakhinov,A (2024) -- Radnaev,A (2052) Ulan Ude 2011 (White won in 47 moves)
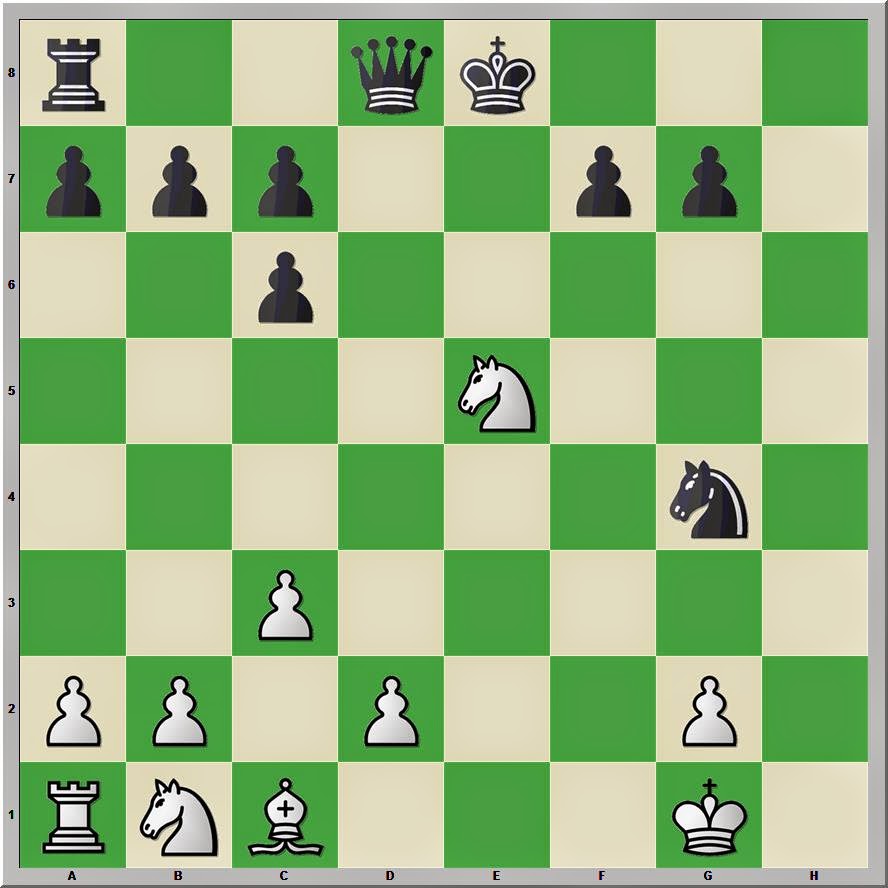
9.Bxf7++- Kf8

9...Kxf7 loses quickly 10.Ng5+

Black to move
Analysis Diagram

a) 10...Ke8 11.Qxg4 Nxd4 12.Be3+-

b) 10...Kf8 11.Qxg4 Qe8 (11...Nd5 12.Ne6+) 12.Qf3+ Kg8 13.Qb3+ Kf8 14.Ne6+ Kg8 15.Nxc7+ Qf7 16.Nxa8+-

c) 10...Kg8 11.Qb3+ Nd5 12.Qxd5+ Be6 13.Qxe6+ Kf8 14.Qf7#

10.Bb3

White has a clear advantage that should prove decisive. I suffered many moves before my opponent finally offered me chances through a blunder.

06 December 2014

Sacrificial Attack

In keeping with the theme of the name of the tournament, today's Solstice Sacrifice youth chess tournament has a problem solving contest concerning a sacrificial attack. In this case, all six positions are theoretical positions that might have occurred, but did not, in Mayet -- Anderssen, 1851.

Black has a winning sequence from each position.

1.

2.

3.

4.

5.

6.