

With Black on move, moving the rook to almost any square along the b-file holds the draw. 1...Rb6 is the clearest and easiest demonstration of the technique. Philidor noted, "By keeping that line with his rook, he hinders your king from advancing" (275).
Mark Dvoretsky notes that Philidor thought that White could win if he were on move, but later analysis has revealed that he is wrong on this point. In Philidor's position, White is on move, but his initial setting differs in one important respect from Dvoretsky's diagram. The pawn has advanced to the fifth rank in Dvoretsky.
Philidor presents the following position.
White to move
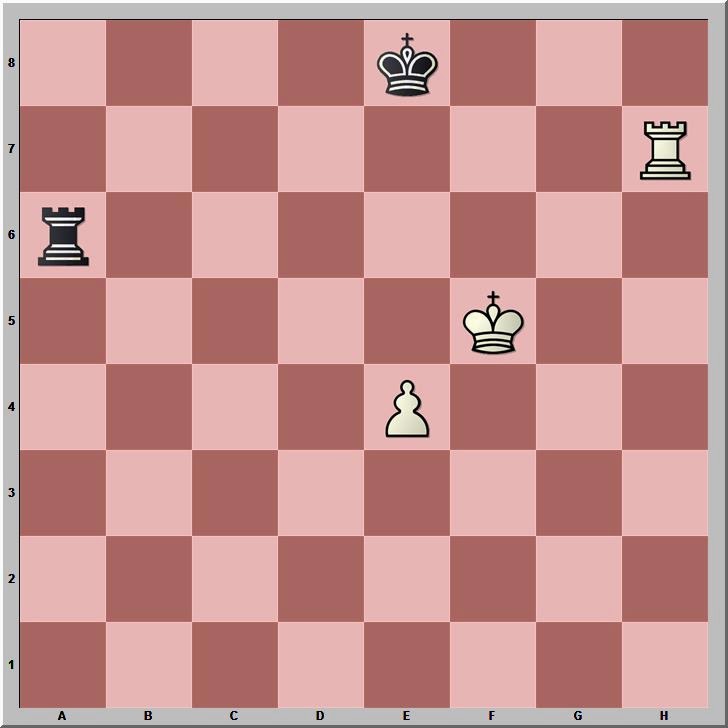
After the moves 1.e5 Rb6 2.Ra7, the position is almost identical to Dvoretsky's with only the Black rook on a different square. With Black on the move, Dvoretsky's key move creates the position in Philidor's analysis, but in Philidor Black is still on move. In some positions, such a transfer of the side to move proves critical, but here it is not so.
Philidor gives 2...Rc6 with the comment: "He ought not to depart from this line with his rook, but at the very instant when you push your pawn" (277).
3.e6 Rc1
"If he had given check, he would have lost the game" (Philidor).
4.Kf6 Rf1+
Philidor asserts, "He must continue to give you check, in order to drive you away from your pawn; and at the very moment when your king falls upon his rook, he will attack and take your pawn" (277).
Philidor's Back-Game**
Philidor's analysis of the position where he asserts that White may win begins from his diagram and offers Black moving first, 1...Ra1.
White to move

We see the essential elements here are the same as in Dvoretsky's position with White to move.
2.Kf6 Rf1+ 3.Ke6 Kf8 4.Rh8+ Kg7 5.Re8
Philidor states that this move is the only one that "can insure the game" (279). Checking the position with tablebases confirms that Philidor was in error, as noted by Dvoretsky.
5...Re1 6.Kd7
Black to move

6...Kf7
This move is the key error. Philidor offers an alternative in the notes: 6...Rd1+ 7.Ke7, but he misses the key defensive idea that was discovered by later analysis, 7...Ra1!
7.e6+ Kg7 8.Ke7
Here, White missed the winning 8.Ra8 (also Rb8, Rd8, and Rc8).
8...Re2+-
8...Ra1 draws, again.
The rest of Philidor's analysis is a good illustration of a winning technique that works in some Lucena positions, but differing from the orthodox bridge building on the fourth rank.
*Other books offer slightly different positions. Silman's Complete Endgame Course (2007) has 6R1/4k2r/8/3KP3/8/8/8/8 (126). Fundamental Chess Endings (2001) by Karsten Muller and Frank Lamprecht has 1r3k2/R7/8/5PK1/8/8/8/8 (177). Grigory Levenfish and Vasily Smyslov, Rook Endings, trans. by Philip J. Booth (1971) has a partial mirror image of the position in Philidor's text: the White king is flipped to the other side of the pawn and the rooks have swapped rook files. It is 4k3/R7/7r/3K4/4P3/8/8/8 (15). Reuben Fine, Basic Chess Endings (1941) is almost identical to Philidor's with only the Black rook one square to the right (287).
**Back-game was the term employed for variations in seventeenth and eighteenth century chess texts.


No comments:
Post a Comment