Anderssen,Adolf -- Staunton,Howard [C01]
London knockout London (3.5), 1851
1.e4 e6 2.d4 g6?!
This second move is not how the French Defense is played today.
3.Bd3 Bg7
Black assaults d4, attempting to weaken White's center. In this case, at least, Staunton's positional sense is consistent with twenty-first century practice.
4.Be3 c5 5.c3 cxd4 6.cxd4
Black to move

6...Qb6
The fork at the heart of Black's assault on d4. After the same initial five moves, Anderssen, playing Black, opted to continue his development, rather than win a pawn. 6...Nc6 7.Ne2 Nge7 8.0–0 0–0 9.Nbc3 d5 10.e5 f6 1–0 Morphy,P -- Anderssen,A Paris 1858 Morphy won in 35 moves.
7.Ne2 Qxb2
Black has won a pawn at the cost of moblization of his forces.
8.Nbc3 Qb6 9.Rc1
This move is "well conceived", according to Staunton. Better than the more obvious Rb1, he states. Stockfish disagrees.
9.Rb1 Qa5 10.Bd2 (10.Rb5?! Qd8) 10...Nc6 11.Nb5 Qd8 and a clear advantage for White.
9...Na6
9...Ne7 10.d5 Qb4
10.Nb5 Bf8
10...Ne7 seems better to me. Even so, White already has a nice game.
11.d5 The threat that Staunton identified as rendering Bf8 necessary. 11...Qd8 12.Nd6+ (12.d6 Nc6) 12...Kf8 13.Nd4 -- with the idea of 14.Qf3, attacking the weakness of f7.
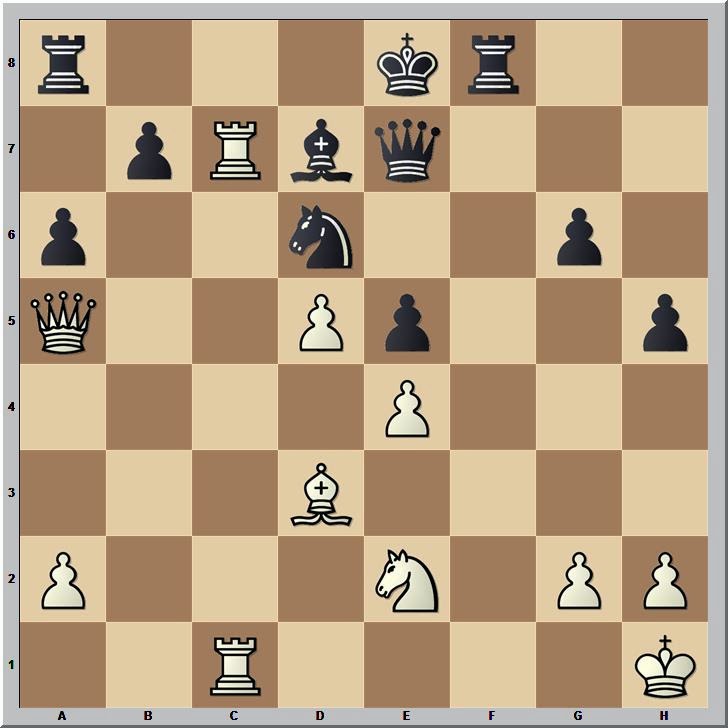
11.0–0 d6 12.d5 Qa5 13.Bd4 e5 14.Bc3 Qd8
White to move
 |
| GM-RAM Diagram 140 |
See "To Know a Position."
15.f4‚ f6 16.fxe5 fxe5
Black's king cannot escape the center, but how will White break through to exploit its vulnerability?
17.Qa4
Beginning the assault on d6 with a threatened discovery.
17...Bd7
Pinning the knight prevents a discovered check, but reduces the defenders of d6.
18.Bb4 Nh6 19.Kh1
White avoids forks that defend d6.
19...Nf7
This position before White's move 20 is GM-RAM diagram 141.
20.Qa3
Black to move

20...Nc5
"Child's play. Throwing away his most important Pawn for nothing!" (Staunton)
I do not agree with Staunton's assessment here.
a) 20...Qe7
Hangs onto a material advantage, but leaves Black's position in shambles.
21.Nxd6+ Nxd6 22.Rxf8+! Qxf8 23.Bxd6 White's position is very strong.
b) 20...Qb8
Fails to bolster the pawn.
b1) 21.Rxf7!? Kxf7 22.Bxd6 (22.Nxd6+ Kg8 23.Bxa6 bxa6 24.Ng1 with compensation for the material) 22...Bxd6 23.Nxd6+ Kg7 24.Nxb7! Rc8 25.Qe7+ Kg8 26.Rb1+-
b2) 21.Rf6! is the computer's choice.
c) 20...Be7
Black's best choice, although it does not retain the pawn.
21.Nxd6+ (21.Bxd6? 0–0) 21...Nxd6 22.Bxd6 Bxd6 23.Qxd6 Qe7 24.Rf6 and White's position seems better.
21.Nxd6+
Better is 21.Bxc5 dxc5 22.d6 and White must regain the pawn with interest. 22...Nxd6 23.Qxc5 (23.Rxf8+!? Kxf8 24.Nxd6‚) 23...Nxb5 24.Qxe5+ Qe7 25.Qxh8 White is up the exchange and Black's king remains stuck in the center.
21...Bxd6 22.Bxc5 Bxc5 23.Qxc5 Qe7 24.Qc7 Nd6 25.Qa5 h5 26.Rc7 Rf8 27.Rfc1 a6
White to move
 |
| GM-RAM Diagram 142 |
28...exd4? Staunton observed that taking the knight would be an error. 29.e5 Nf7
(29...Qxe5 30.Bxg6+ Nf7 31.Re1 White will win material of greater value than the knight ... and the assault on Black's king will continue.)
30.e6 Nd6 31.exd7+ Kf7 (31...Kd8 32.Rc8+ Kxd7 33.Qc7#) 32.d8N+ Rfxd8 33.Rf1+ Nf5 34.Rxe7+ Kxe7 35.Bxf5+-.
29.Ne6
"At this crisis, the game, having lasted several hours, was postponed by mutual consent until the next day." Howard Staunton
Staunton notes that White has a clear advantage.
29...Rxc7 30.Rxc7 Rf7 31.Qb6
Fiddling around is search of the most precise moves, I looked through these variations. Neither of them seem superior to Anderssen's choice.
31.Qc3 Nb5 32.Bxb5 axb5 33.h3.
31.Nc5 Qf6 32.h3
31...Rf6 32.h3 g5 33.Qb2 Nb5 34.Bxb5 axb5 35.Qxe5
Black to move
White finally has a material advantage.
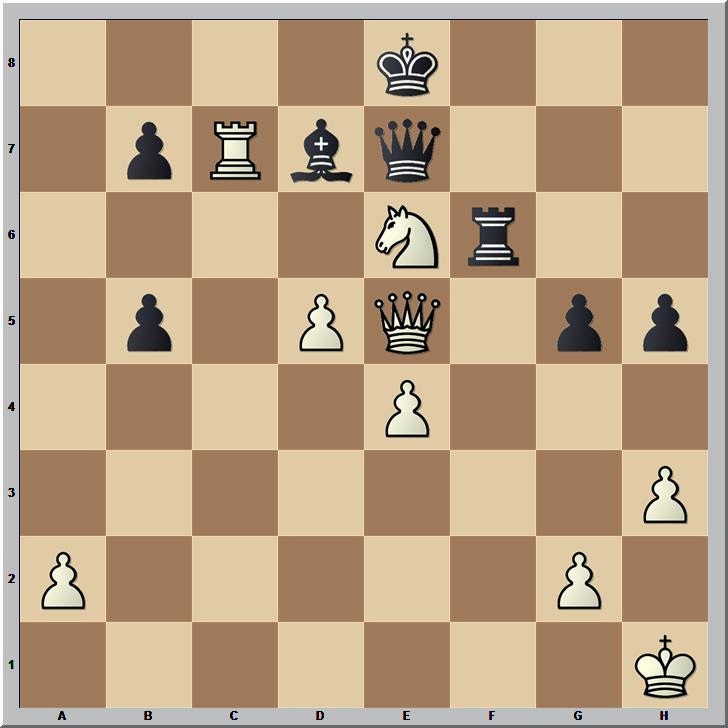
35...h4 36.Rxb7 Rf1+ 37.Kh2 Qf6
White to move

White has a mate in six.
38.Rb8+
The game ends more rapidly after 38.Qb8+ Kf7 39.Rxd7+ Qe7
(39...Kg6 40.Qg8+ Kh5 41.Qh7+ Qh6 42.Ng7#)
40.Qf8+ Kg6 41.Qxe7 Rh1+ 42.Kxh1 b4 43.Qxg5#.
38...Ke7
a) 38...Bc8 39.Rxc8+ Kf7
a1) 39...Kd7 40.Qc7#.
a2) 39...Ke7 40.d6+ Kd7 41.Rc7+ Ke8 42.Ng7+ Kf8 43.Qe8#.
40.Rf8+ Kg6 41.Rxf6+ Rxf6 42.Qxg5+ Kf7 43.Qg7+ Ke8 44.Qxf6 b4 45.Qf8+ Kd7 46.Qd8#.
b) 38...Kf7 39.Rf8+ Kg6 40.Rxf6+ Rxf6
b1) 40...Kh5 41.Ng7#.
b2) 40...Kh7 41.Qxg5 Rh1+ 42.Kxh1 Bxe6 43.Rh6#.
41.Qxg5+ Kf7 42.Qg7+ Ke8 43.d6 Rxe6 (43...Bxe6 44.Qe7#) 44.Qg8#.
39.d6+ Kf7 40.Rf8+ Kg6 41.Rxf6+ Rxf6 42.Qxg5+ Kf7 43.Qg7+ Kxe6 44.Qe7# 1–0


No comments:
Post a Comment