29 October 2016

Learn to Castle

Lesson of the Week

For my beginning students this week, I wrote three rules for castling on the whiteboard. When these three conditions are met, it is legal to castle. Castling moves two pieces--king and rook. It is the only way a king can move more than one square, and is the only time that more than one piece may be moved on a player's turn. In most games, it is a necessary precaution to decrease the vulnerability of the king. Castling has the added benefit of bringing a rook closer to the center, the usual scene of the battle in chess.

1) It must be the first move for both the king and the rook.
2) There must be no pieces between the king and the rook.
3) The king may not castle out of check, through check, or into check.

To illustrate the benefits of castling, I presented the following miniature from Greco. It was published in Francis Beale, The Royall Game of Chesse-Play (London, 1656). I take it from that source. Beale's version of this game differs at Black's move 18 from the one published in the more widely known Professor Hoffman [Angelo Lewis], The Games of Greco (London, 1900). Hoffman's version is the one found in David Levy, and Kevin O'Connell, Oxford Encyclopedia of Chess Games, vol. 1 1485-1866 (Oxford, 1981) and in databases.

Gambett VI (Greco) [C54]
1656

1.e4 e5 2.Nf3 Nc6 3.Bc4 Bc5 4.c3 Nf6 5.d4 exd4 6.cxd4 Bb4+ 7.Nc3 Nxe4

White to move

8.0–0

White meets all three conditions listed above. This notation means that White's king moves two squares towards the rook, and then (or at the same time), the rook moves to the square that the king moved over (see next diagram).

8...Nxc3 9.bxc3 Bxc3 10.Qb3

Black to move

10...Bxa1

Black's last chance to survive was 10...d5.

After the greedy rook grab, Black is materially ahead a rook and two pawns, but is completely lost due to the king's vulnerability and White's well-coordinated pieces. White may be down material on the whole board, but in the battle White has a substantial and decisive material advantage.

11.Bxf7+ Kf8 12.Bg5 Ne7 13.Ne5 Bxd4 14.Bg6 d5 15.Qf3+ Bf5 16.Bxf5 Bxe5 17.Be6+ Bf6 18.Bxf6 gxf6

Hoffman and database have 18...Ke8 19.Bxg7 1-0

I also showed the students a possible variation beginning with 18...Qd6. In this line, there is no immediate checkmate, but White wins back all of the sacrificed material and more, reaching an easily winning endgame.

19.Qxf6+ Ke8 20.Qf7# 1–0


My advanced students worked in pairs on a worksheet that I created last spring for a chess camp. It is elsewhere on this blog: "Incomplete Miniatures".

28 October 2016

Winning

I won two USCF rated tournaments this week!

On Monday, I won a USCF online blitz rated game 10 on Chess.com. After winning two of the first three of such events that I entered earlier this year, I suffered poor results. Only once did I play well enough to raise my rating. But, this week, I played differently. Instead of playing super fast as is my usual pattern, I expended lots of time in the late opening and middlegame. Frequently, I found myself in serious time pressure near the end of the game, but usually with a very good position. Expending the time to calculate when I think I understand the position has been a focus in my training lately. My subpar performance through my last five weekend tournaments--dropping my rating more than 150 Elo--finally grabbed my attention and forced changes in my approach to chess.

After taking care of business against lower rated players in the first two rounds, I faced a strong opponent in the third.

Black to move

With the Black pieces, I spent 38 seconds in this position deciding that it was safe enough to castle queenside.

14...Qxe3 15.Bxe3 seemed to invite suffering.
14...O-O 15.Qxd4 exd4 looked to me like a losing proposition. Hanging on to the isolated pawn seemed futile.

14...O-O-O! 15.Bc2 Kb8 16.f3 Be6 17.Rd1

Black to move

Again, I spent nearly half a minute considering two possibilities.

17...Qxe3+

The alternative, which I seriously considered, was 17...Qxd1+ 18.Bxd1 Rxd1+ 19.Kf2 Rc8 20.Ke2

18.Bxe3 Rxd1+ 19.Rxd1 b6

This move was played after eleven seconds and had been part of my consideration in the twenty-one seconds spent on the previous move. During this time, I decided that I would fight to maintain a position with good chances for equality and let my opponent decide whether to press for a win and endure the risk for doing so.

20.a3 Rc8 21.Bd3 Bc4

White to move

My plan was to swap bishops and rooks and go into an ending of knight versus bishop, thinking that my knight was possibly slightly better. My opponent opted to keep more pieces on the board, but this let my pieces become more active. Eventually, a few errors by White allowed me to win the pawns on the queenside. When I finally got my knight versus bishop ending, I was ahead a pawn. When we exchanged these two pieces, I had an elementary winning pawn ending.

In round four, my opponent stepped into an elementary tactic.

White to move

15.Rxd5 cxd5 16.Bb5 1-0

Trying a somewhat new (to me) idea in the French Defense, exchange variation in the last round, I missed a thematic move that I routinely play in similar circumstances and had to fight for a draw. After we had repeated the position three times, the game was drawn on move nineteen.

Black to move

I played 5...dxc4, conceding the initiative. 5...Bb4+ is the correct move.

With 4.5/5, I won clear first.

Last night, I played in a rapid event at the Spokane Chess Club. In the first round, my use of the Dutch Defense against the English Opening led to an interesting game. I secured the initiative and won a pawn. As a result of my opponent's counterplay, we reached a rook ending where I was a pawn ahead, but his pawn structure was better and his rook more active. I initiated some exchanges to activate my rook, but reached a position that was probably objectively drawn. Luckily, my opponent blundered in a way that allowed me to remove his last queening threat and exchange rooks ito an easily winning pawn ending.

In round two, I played John Frostad, who beat me and everyone else this summer to win the Spokane Contenders (see "Ne2?"). After he equalized too easily against my Catalan, he lost his way in the middlegame. with a time control of 15 +3, he spent more that six minutes on this horrid position.

Black to move

Playing the same position against Stockfish this morning, I faced the same moves that John played after his long think. Again, I had trouble finding my way in a superior position. Stockfish, however, did not have the time trouble that John faced last night. I went on to win against John. This morning, I beat Stockfish also, but not on my first attempt. I required several draws and at least one loss before I found my way against the Silicon monster.

I do not always record my games in rapid chess, and so lack a record of last night's games beyond my memory of a few key positions.

In round four, I was way ahead on the clock after my opponent squandered a clear advantage. I returned the favor, but he had four seconds plus the three second delay to my five minutes as he tried to hold this drawn position.

White to move

Perhaps a gentleman would have offered a draw in such a position, but I am no gentleman in rapid chess. My opponent flagged after many moves where I kept giving him opportunities to err.

In the last round, I played Pat Herbers, who has returned to active play after nearly a decade of inactivity. As he had drawn another opponent earlier, I could win the event with a draw. Mentioning this fact before the game, Pat recalled a story from the mid-1970s when he beat a young Yasser Seirawan in a tournament in Seattle. Pat was Spokane's top junior player in the 1960s and nearly reached master when living in Seattle a few decades ago.

I played a thematic d4-d5 push on instinct. As we both slowed our play to consider the tactical ramification, Pat found the refutation and I was down a pawn. His subsequent errors in a clearly superior ending, however, let us reach this position.

White to move

I opted to exchange my h-pawn for his f-pawn. Although my king was never able to leave g2 and h2, the existence of a passed pawn of my own kept his king from waltzing over to the queenside.

I offered a draw in this position.

Black to move

Pat accepted the draw offer and settled for a share of second place.

27 October 2016

Blunderful

I enjoy playing the Greco gambit in blitz,* but sometimes my opponents throw me a curve. An online blitz game this morning after watching most of the first hour of the Carlsen -- Nakamura blitz and bullet battle revealed gross errors by both players. The miserable failure to calculate simple variations suggests that neither player deserves their approximate 1900 online blitz ratings.


Stripes (1919) -- Internet Opponent (1882) [C53]
Live Chess Chess.com, 27.10.2016

1.e4 e5 2.Nf3 Nc6 3.Bc4 Bc5 4.c3 Qe7

This move was quite popular for centuries, but I don't see it much these days.

4...Nf6 is the almost universal choice.

5.0–0 Nf6

5...d6 is the main line and certainly prevents what transpired after serious errors by both players.

6.Re1

6.d4 seems sensible.

Black to move

6...0–0

6...Ng4 complicates matters 7.d4 exd4 8.cxd4 Nxd4 9.Nxd4 Qh4 10.Be3 Qxh2+ 11.Kf1 and White seems slightly better with a significant lead in development balancing the exposed king.

7.d4

7.h3 d6

Black equalizes with 7...Bxf2+ 8.Kxf2 Qc5+ 9.d4 Qxc4=.

8.d4 Bb6 9.Na3 Kh8 and White won in 39 moves in Castaldi,V (2400) -- Blau,M (2456), Venice 1951.

7...Bb6 8.d5

8.h3 may be best.

8...Nb8

8...Ng4 9.dxc6 Nxf2 10.Qe2 Ng4+ 11.Kh1 Nf2+=

9.Bg5

Black to move

9...c6??

Black throws away the game by allowing complete immobilization of the queenside.

9...d6 keeps the game balanced.

10.d6 Qd8 11.Nxe5 Bxf2+ 12.Kh1

12.Kxf2 was correct, but I did not take time to calculate the apparently forcing line that I feared. 12...Nxe4+ 13.Rxe4 Qxg5 Black's queen alone cannot battle most of White's army.

12...Bxe1

Down a whole rook, I was comfortable with my more active pieces. Indeed, Stockfish says that I am better. No surprise given Black's inability to move any queenside pieces to useful squares. It will require many pawn moves before the bishop and rook come into play.

White to move

13.Qb3??

It is one thing to favor positional over material considerations, and quite another to throw away pieces recklessly.

13.Qxe1 with clear compensation for the exchange was the appropriate move.

13...h6??

13...Qb6 14.Bxf7+ Kh8 and now what? White is losing.

14...Rxf7?? 15.Qxf7+ Kh8 16.Qf8+ Ng8 17.Nf7#.

14.Bxf7+

Again, White has a clear edge.

14...Rxf7

14...Kh8

15.Nxf7??

15.Qxf7+ Kh8 16.Ng6+ Kh7 17.Nf8+ Kh8 18.Bxh6 Ne8 19.Ng6+ Kh7 20.Ne7 and Black's king has no defenders.

15...Qf8 16.Nxh6+ Kh7

White to move

17.Nf5??

17.Qc2! Ng4 (17...gxh6 18.e5+) 18.Nf5 g6 19.Be7 seems better for White.

17...Nxe4 18.g4 Nxg5 19.Na3 Bh4 20.Rf1

Worsens White's position, but White is lost in any case.

20...g6 21.Qc2

Black to move

21...gxf5??

21...Kh8 and Black will win.

22.Rxf5 Qg7

22...Kg7 23.Rxf8 Kxf8 also wins for White.

23.Rxg5+ Kh8 24.Rxg7 Kxg7

White to move

According to point count chess, Black has a slight material advantage. Alas, only one Black piece in on the field and is no match for the knight and queen.

25.Nc4 b5

25...Bf6 26.Qf5 b5 27.g5 and there should be a checkmate soon.

26.Ne5 Na6 27.Qf5

27.Qg6+ Kh8 28.Nf7#.

27...Bb7 28.Qf7+ Kh8 29.Ng6# 1–0

If I need a reason to give up blitz, the errors in this game should be sufficient. Alas, blitz is not only a drug, but usefully entertaining so long as one does not insist on standards for good chess. Even Hikaru Nakamura and Magnus Carlsen displayed several magnificent blunders in today's games, although their errors were nothing like those in this game. It is worth noting that both super-GMs often took fifteen to thirty seconds to calculate during their blitz fest. The longest time spent by either player in this blunder-filled game was eleven seconds. One of the gross blunders was played after nine seconds.


*See "Materialism" for another example.

23 October 2016

Superior Pawn Structure?

According to Ketevan Arakhamia Grant, who annotated this game for Chess Informant 124, White has the upper hand in this position.

Black to move
After 29.b3

The game was played in the first round of the 2015 Women's World Championship in Sochi, Russia. Her opponent  was Thanh Trang Hoang, who played the French Defense.

Black has a passed pawn and apparently has White's queenside pawn majority stopped.

What accounts for the assessment that White is better?


21 October 2016

Playing with Rooks

Lessons for both my beginners and advanced students focused on rooks this week. For the beginners, the lesson focused on an elementary checkmate. The advanced students learned the basic plans for defending the Philidor Position.

Checkmate with Rook and King

White to move

I showed the students two methods and then asked them to practice with a partner. As several of these children are still learning how to set up and move the pieces, mastery of this skill was not expected. We will revisit this skill again later this fall.

First Method:

Drive the enemy king to the last rank, using check when the two kings stand in opposition.

1.Rh4

Taking control of the fourth rank confines Black's king to half of the board.

1...Kf5 2.Ke2

White's king moves forward on the file adjacent to the Black's king's file.

2...Kg5 3.Ra4

When the rook is attacked, it runs to the other side of the board.
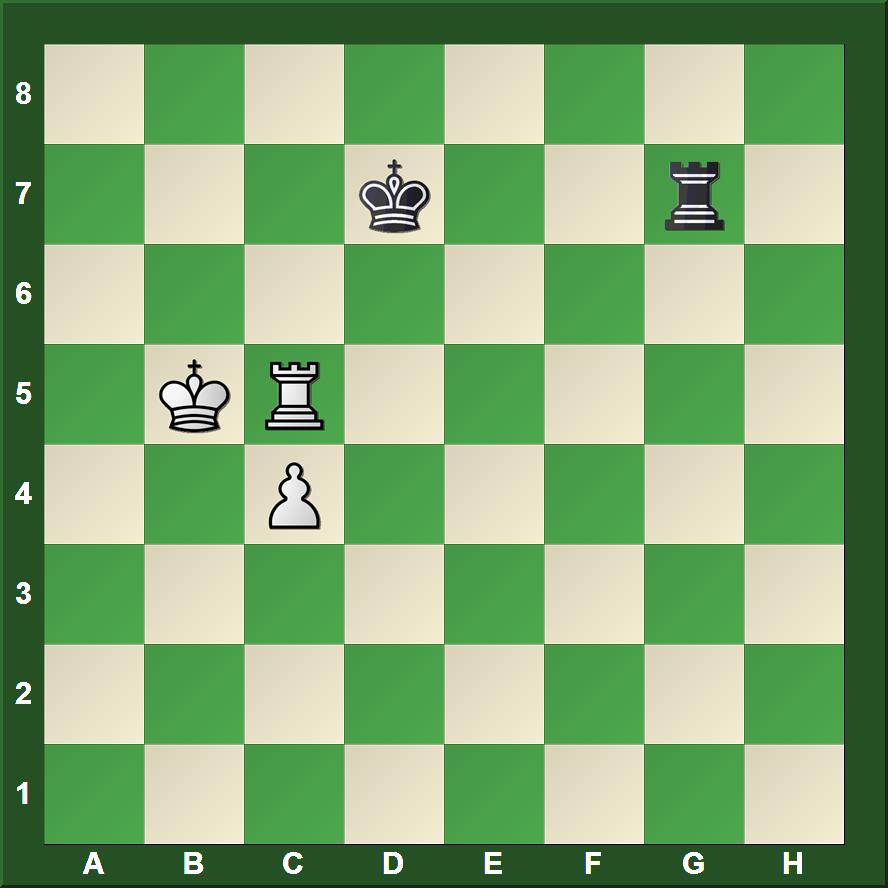
3...Kf5 4.Ke3 Ke5

White to move

The two kings stand with one square between them on the same file. We call this position opposition. Controlling the opposition is an important element in pawn endings (see "Opposition and Outflanking").

Here, it is time to move the rook forward, checking the king and driving him backwards towards the eighth rank.

5.Ra5+ Kd6 6.Ke4 Kc6 7.Kd4 Kb6 8.Rh5 Kc6

White to move

9.Rg5

Moving the rook one square presents Black with a choice: move closer to an edge or take the opposition and be driven back by a check.

9...Kd6 10.Rg6+ Ke7

White continues repeating the same patterned moves, slowly pushing the Black king backwards.

11.Kd5 Kf7 12.Ra6 Kg7 13.Ke5 Kh7 14.Kf5 Kg7 15.Rb6 Kh7 16.Kg5 Kg7 17.Rb7+ Kf8 18.Kg6 Ke8

White to move

19.Kf6 Kd8 20.Ke6 Kc8 21.Rh7 Kb8 22.Kd6 Ka8 23.Kc6 Kb8

White to move

24.Rg7 Ka8 25.Kb6 Kb8 26.Rg8# 1–0

The first method is neither efficient nor elegant, but it has the virtue of being easy to learn. At least some students find it easier to learn. Others might find the second method, the one that I usually teach, just as easy.

Second Method

Confine the enemy king to an ever-shrinking box. Use the rook and king in coordination. A distinctive element of this method is that it can be performed without checks until the final checkmate. The stronger side forces the weaker side back by controlling the desired escape squares.

1.Ke2

White's king moves closer. 1.Rf2 also works.

1...Kf5 2.Ke3 Ke5

White to move

3.Rd1

In the first method, White would play Rh5+ here. 3.Rd1 confines the Black king to a box bordered by the d-file and the fourth rank.

3...Kf5 4.Rd4

Securing the box.

Black to move

4...Ke5

Naturally, Black attempts to provoke an error. How can White make progress now?

5.Kd3

White's move does not change the principal feature of the position--the box maintained by the rook. Now, Black must move away from the rook.

5...Kf5

White to move

6.Re4

White makes the box smaller. Now the fourth rank and the e-file are the boundaries.

6...Kg5 7.Kd4 Kf5 8.Kd5 Kf6 9.Re5

Black to move

Compare Black's confinement to nine squares after nine moves to the other method where Black still has eighteen squares after the same number of moves.

9...Kf7 10.Re6 Kg7 11.Ke5 Kf7 12.Kf5 Kg7

White to move

13.Rf6

Black's king is confined to four squares.

13...Kh7 14.Rg6

And now Black is confined to two squares. Do not confine the king to only one, however, for that would be stalemate.

14...Kh8 15.Kf6 Kh7 16.Kf7 Kh8

White to move

17.Rh6# 1–0


Philidor Position

The defensive technique known as the Philidor position was described in François-André Danican Philidor, Analysis of the Game of Chess (1777). See "Philidor Position: Historical Note" for his analysis.

For my students, I found two games played by chess masters more than a century ago where a Philidor Position arose and was played correctly. Naturally, the stronger side will play many moves in the hope that the other player goes astray due to boredom or time pressure.

My students are accustomed to coming into chess club to find a position on the demo board. They inquire as to who has the move, and then begin suggesting the move they think is best.

I insisten that they needed not a move, but a plan. First, they must ask whether White's position is better, equal, or inferior. Once they determine that it is inferior, they know that a draw would be a good result.

The plan: White occupies the third rank with his rook and maintains it until Black advances the pawn. Then White's rook goes to the eighth rank to endlessly check the enemy king.

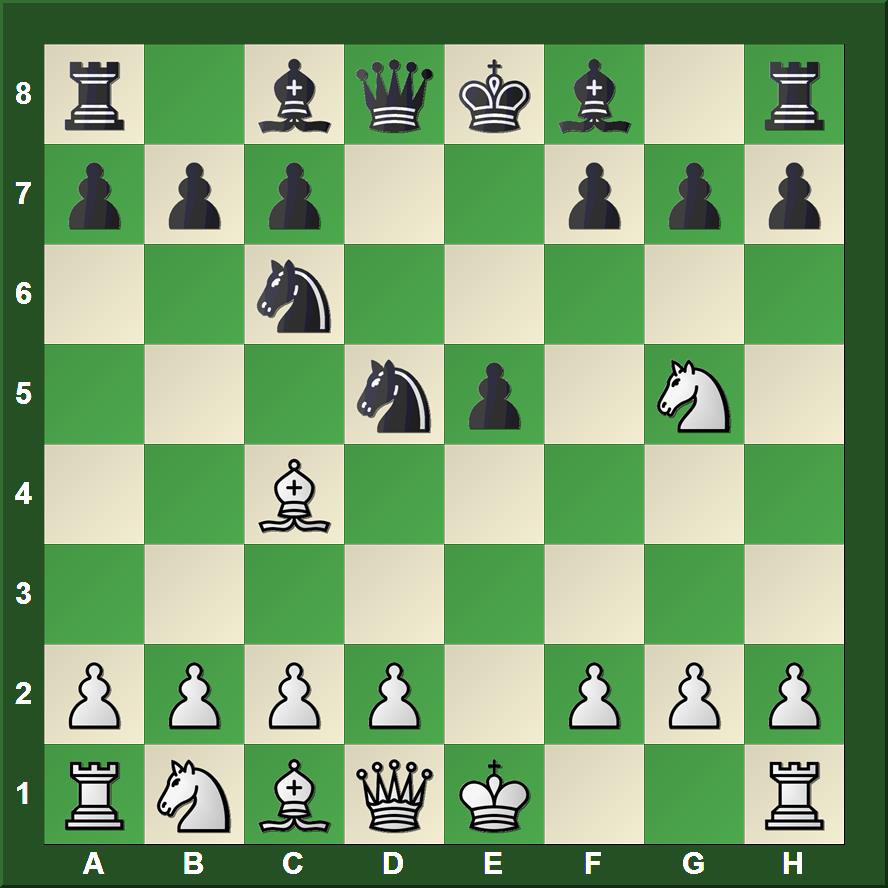
Marco,Georg -- Albin,Adolf 
Monte Carlo (11), 1902

White to move

52.Rc3

One student may have suggested this move instantly, but it is acceptable only after the plan has been articulated. A chess engine can suggest several moves that lead to a draw. With brute force calculation, the position is not yet critical. Humans need less calculation when they understand the plan.

52...Ra5 53.Rb3 Ra2 54.Rc3 Rd2 55.Rb3 Re2

White to move

Black tries to create complications by contesting the third rank.

56.Kf1

The other element of the plan is to keep the king in front of the pawn. In order to play rook endings properly, a player must understand the fundamentals of pawn endings. White could lose here via 56.Ra3 Re3 57.Rxe3?? fxe3 58.Kf1 Kf3-+

56...Rh2 57.Kg1 Rh5 58.Ra3 Rd5 59.Rb3 Kf5 

White to move

60.Kf2 Kg4 61.Ra3 Rd2+ 62.Kf1 Rb2 63.Rc3 Rb4 64.Kg2 Rb2+ 65.Kf1 Kf5 66.Ra3 Rh2 67.Ra5+

Black to move

White is happy to check endlessly from the long side of the pawn. It is worth noting that checks from the short side do not work.

67...Kg4

Black returns his king to refuge from checks.

68.Ra3 

White returns to the third rank.

68...Rd2 69.Rb3 Kf5 70.Ke1 Rd4 71.Ke2 Ke4 72.Ra3 Rb4 73.Kf1 Kf5

White to move

74.Kf2 Kg4 75.Rc3 f3

Having tried a few tricks that failed, Black advances the pawn.

76.Rc8 Rb2+ 77.Kf1 ½–½

Black saw no reason to continue. It had become clear that Marco was a student of Philidor, as all chess players should be.

The second example contains fewer moves.

Winawer,Szymon -- Weiss,Miksa
Vienna (32), 19.06.1882

Black to move

128...Rg6

Knowing the plan, students quickly suggested and explained this move.

129.Rh5 Kc7 130.Rh7+ Kc8 131.c5 Rf6 132.Rh5 Rg6

Just shuffle the rook back and forth on the sixth rank as far from the enemy king as possible.

133.Kc4 Kc7 134.Kd5 Rf6 135.Re5 Rh6 136.Re7+ Kc8 137.Ra7 Rg6 138.Kc4 Rh6 139.Kb4 Rg6 140.Rf7 Rh6 141.Rf5 Kc7 142.c6 Rh1 ½–½

20 October 2016

Discovery!

White played the strongest move in this position from Marovic -- Pomar Salamanca, Espana 1969, Chess Informant 7/505.

White to move

I will respond to solutions left in the comments section below.

16 October 2016

Find the Only Move

These positions arose in Simon Williams' commentary on Gelfand -- Nakamura 2010 in his video "Hikaru Nakamura Teaches the KID" on Chess.com.

The first position arose in three games. Once, White found the correct move. FM Delisle Warner was White in that game, scoring an upset win against IM Kevin Denny.

White to move

The second position comes about a couple moves after 22...h4 instead of Nakamura's 22...Nh4.

White to move

Finally, Gelfand could have stayed in the game with the right move in this third position.

White to move

Can you find the only move in each position?

13 October 2016

Fried Liver Attack

In the second week of after school chess club, my beginning group doubled in size and includes several who have never played chess. While emphasizing how the pieces move and other first things, I showed the group Gibaud -- Lazard 1924, then offered assistance as the students paired off and played.

The advanced group saw this game, but not with all of the annotations presented here.

Von der Lasa,Tassilo -- Mayet,Carl [C57]
Berlin Berlin, 1839

1.e4 e5 2.Nf3 Nc6 3.Bc4 Nf6 4.Ng5

White's aggressive move immediately presents Black with some problems.

4.d3 is the main line and scores best.

4...d5

4...Bc5 is the other principal way of meeting White's threats. 5.Nxf7 Bxf2+ 6.Kf1 and White should be better 6...Qe7 7.Nxh8; 4...b5 5.Bxf7+ Ke7 6.Bb3.

4...h6 5.Nxf7 Qe7 6.Nxh8 was played in De Wit -- Soylu 1999.

5.exd5 Nxd5

Accepting the Fried Liver gives White strong practical chances. Black is okay, and probably better, but it is much easier for Black to err. Moreover, errors are often fatal.

5...Na5 is a recommended alternative, as we saw last week.

White to move

6.Nxf7

6.d4 is an alternative, leading to:

a) 6...Bb4+ 7.c3 Be7 8.h4 Bxg5 9.Bxg5 Qd7 10.dxe5 Nb6 and was drawn in 47 moves Stoltz,G (2487) -- Karaklajic,N (2436), Belgrade 1952.

b) 6...exd4 7.0–0 Be6

7...Be7 was played against Paul Morphy when he was playing blindfold 8.Nxf7 Kxf7 9.Qf3+ Ke6 10.Nc3 dxc3 11.Re1+ Ne5 12.Bf4 Bd6 13.Bxe5 Bxe5 14.Rxe5+ Kxe5 15.Re1+ Kd4 16.Bxd5 Rf8 17.Qd3+ Kc5 18.b4+ Kxb4 19.Qd4+ 1–0 Morphy,P -- Amateur,New Orleans 1858.

8.Re1 Qd7 9.Nxf7 Kxf7 10.Qf3+ Kg8 11.Rxe6 is the line recommended by Tartakower and Du Mont, 500 Master Games of Chess (1952). Last week's game also came from this book.

6...Kxf7 7.Qf3+ Ke6

Beginners sometimes play 7...Ke8 8.Bxd5 Qf6 9.Bxc6+ bxc6 10.Qxf6 gxf6 11.d3 and White has a clear advantage with both material and positional superiority.

8.Nc3

Black to move

8...Nce7

8...Ncb4 is Black's principal alternative, and one that I prefer as Black.

White's main responses are:

a) 9.Qe4 c6 10.a3 Na6

Alternately, Black can return the material in hopes of finding a secure home for the king 10...Nxc2+ 11.Qxc2 Kf7.

11.d4 Nac7 12.Bf4 Kf7 13.Bxe5 Be7 14.0–0–0 with a clear lead in development for White.

b) 9.Bb3 c6 10.a3 Na6 and Black is surviving for now.

c) 9. a3 Nxc2+ 10.Kd1 Nxa1 11.Nxd5 Kd6 12.d4 Be6

In a correspondence game ten years ago, I played 12...b5 13.Ne7!? and I spent several hours finding Bg4.

The knight is untouchable:


13...Bxe7 14.Qd5#
13...Kxe7 14.Qf7+ Kd6 15.Qd5+ Ke7 16.Qxe5+ Be6 17.Qxe6#
13...Qxe7 14.Qd5#

13.Re1 b5 14.Nb4 bxc4 15.Qc6+ Ke7 16.Bg5+ Kf7 17.Bxd8 Rxd8 18.Qxc7+ Rd7 19.Qxe5 Rd6 20.d5 Bd7 21.Qf4+ Kg8 22.Qxc4 a5 23.Nd3 a4 24.Nc5 h5 25.Nxd7 Rxd7 26.d6+ Kh7 27.Re6 g6 28.Rxg6 1–0 Shirov,A (2709) -- Sulskis,S (2544), Tromso 2014.

9.d4 b5 10.Nxb5 

Black to move

10...c6

Students were asked to find White's refutations of 10...Ng6.

11.Bxd5+ Qxd5 12.Nxc7+

11.Nc3 Qb6

11...Bb7 is met by 12.Ne4.

12.dxe5 Bb7 13.Ne4 Qb4+?

13...Kd7 may be Black's best chance.

14.Bd2 Qxc4

White to move

This position offers a good example of materialism vs. piece activity and coordination. White has sacrificed two minor pieces, netting three pawns, but has a decisive attack.

15.Qg4+! Kxe5 

15...Kf7 16.Nd6+ Kg8 17.Qe6#
15...Nf5 16.Ng5+ Kd7 17.Qxc4+-.

16.f4+ Kd4 

16...Kxe4 17.Qe6+ Kd4 18.Be3+ Nxe3 19.Qe5#.

17.c3+ 

17.0–0–0 wins as quickly.

17...Nxc3 18.Bxc3+

Black to move

18...Kxe4

18...Qxc3+ 19.bxc3+ Kc4 20.Qe2+ Kd5 21.0–0–0+ Ke6 22.Ng5+ Kf5 23.Qe6+ Kxf4 24.Nh3#.

19.f5+

Von der Lasa missed a quicker checkmate:19.0–0–0 Qd3 20.f5+ Kd5 21.Rxd3+ Kc5 22.Qb4#.

19...Kd5 20.0–0–0+ Kc5 21.b4+ Kb5 

21...Kb6 22.Qxc4

22.a4+ 1–0

White regains far more material than he sacrificed to create an attack against the king.

09 October 2016

07 October 2016

Converting the Advantage

The most difficult part of chess is to win a won game.
Wilhelm Steinitz*
I might have won my last round game in the Eastern Washington Open on Sunday, which would have given me an even score for the event. My game had been comfortable throughout and my position was never worse. My confidence was also strong.

Courtney,Caleb (1466) -- Stripes,James (1794) [C02]
Eastern Washington Open (5), 02.10.2016

Black to move
After 39.f4
I was certain that I was winning at this point in the game.

39...Rb1

Thinking the a-pawn would be easy to stop without a serious concessions, I chose to force the rooks off the board immediately.

39...Rb2 wins more easily. One possible line might be 40.Rf1 Rxa2 41.Rf2 Ra1+ 42.Rf1 Rxf1+ 43.Kxf1 d4 44.Ke2 Ke6 45.Kd2 Be4.

40.Rxb1 Bxb1 41.a4 Ke6 42.Kf2 Be4?

I also considered 42...Bf5 and  42...d4. Bf5 is no better than Be4, but 42...d4 is best, according to Stockfish. I imagined my bishop and pawn standing side-by-side on e4 and d4, barring entry of the White king into action. I did not look at the two pieces accomplishing the same standing on d3 and d4.

Earlier in the game, I felt that I had pushed my c-pawn too soon, rendering the win more difficult. Now, I was reluctant to push the d-pawn before preparation. Unfortunately, White's drawing chances are now very good.

43.g3?

My opponent thought this move was forced, but as long as the king remains on f2, it can be delayed. First, White needs to reduce the bishop's mobility by forcing it to remain on the long diagonal,

43.a5! d4 44.a6 h5 45.a7 Kf5 46.g3 g5=

43...h5?

Again, I considered 43...d4, which had been the only winning move.

44.Ke3 Bf5 45.Kd4 Bh3 46.a5 Bf1 47.h3

47.f5+ Kxf5 48.Kxd5 g5 49.e6 Kf6 50.Kd6 Bb5!

47...g6 48.g4?

48.Kc5 Bc4 49.Kb4 Be2=

Black to move

Now, thinking that I could very easily lose, I spend ten minutes on this position. I worked out pretty much the line that the game followed where both players promote on the same move, but also thought that I might still have some winning chances.

48...h4! 49.f5+

49.g5 creates problems for Black, but Ke7 leaves White practically in zugzwang.

49...gxf5 50.gxf5+ Kxf5 51.Kxd5 Bxh3 52.Kd6 

Black to move

52...Kf4??=

I played this move almost without hesitation. I felt that I had solved my problems and could secure the draw. Alas, I was still winning and could have easily invested half of my remaining sixteen minutes discovering how. White's problem in the race between his e-pawn and my h-pawn is that his king must also move.

After the game, we looked at 52...Bg2 53.e6 Kf6 54.Kd7 h3 55.e7

Analysis diagram after 55.e7
55...Bc6+! 56.Kxc6 Kxe7 57.a6 h2 58.a7 h1Q+ and Black wins.

Even better is 52...Bf1 53.e6 h3 54.e7 Bb5 55.a6 h2 56.a7 h1Q with an easy win.

Before playing 48...h4, I had examined 52...Kg6, and worked out that it was losing, missing that after 53.a6, 53...Bg2 kept the win in hand.

53.a6 Bg2 54.e6 h3 55.e7 h2 56.e8Q h1Q 57.Qe5+

My opponent offered a draw here, stating that he had a perpetual. I said that I did not disbelieve him, but wanted to see the proof.

57...Kg4 58.Qg7+ Kf3 59.Qf6+ Kg3 60.Qg5+ Kf2 61.Qd2+ Kg1 62.Qe1+ Bf1 63.Qg3+ ½–½

Even at the end, I thought I might play on 63...Qg2 64.Qxg2+ Bxg2 and let the game end when my bishop captures his last queen.

It was a disappointing tournament, as were all my others in 2016. Nonetheless, I enjoy learning from my errors in this game. Perhaps next time I play chess in a weekend Swiss, I will play with determination and creativity, finding every win that presents itself even after making depressing errors.

One more tournament like those that I played this year and I will be at my rating floor, down almost 300 from my peak in 2012.


*This quote and others that are similar have been attributed to several chess masters, most often Emanuel Lasker or Frank Marshall. Electronic searches of Lasker's Common Sense in Chess and Lasker's Manual of Chess fail to turn it up, however. Edward Winter, who continually labors to source such expressions, offered in A Chess Omnibus (2003) Adolph Albin, Schach-Aphorismen und Reminiscenzen (1899). Albin lists it among a sequence of chess aphorisms.

Then, in Chess Note 5349 (26 December 2007), Winter notes that the saying appears in Chess Player's Chronicle (13 December 1890), where it is attributed to Wilhelm Steinitz. Winter requests earlier attributions.