25 November 2016

Karjakin -- Carlsen 2016: Critical Positions

The World Chess Championship is tied 5-5 after ten games. Today is a rest day. Before the match, many were predicting a victory for the reigning champion, Magnus Carlsen. Some even thought that Carlsen would retain his title in fewer than twelve games, regarding Sergey Karjakin as clearly the inferior player. Karjakin had not been a favorite to win the Candidates tournament either. Nonetheless, Karjakin defended well in difficult positions early in the match. Perhaps Carlsen had a stronger move in a few cases. Karjakin also missed a few better moves. Some of those positions are presented below.

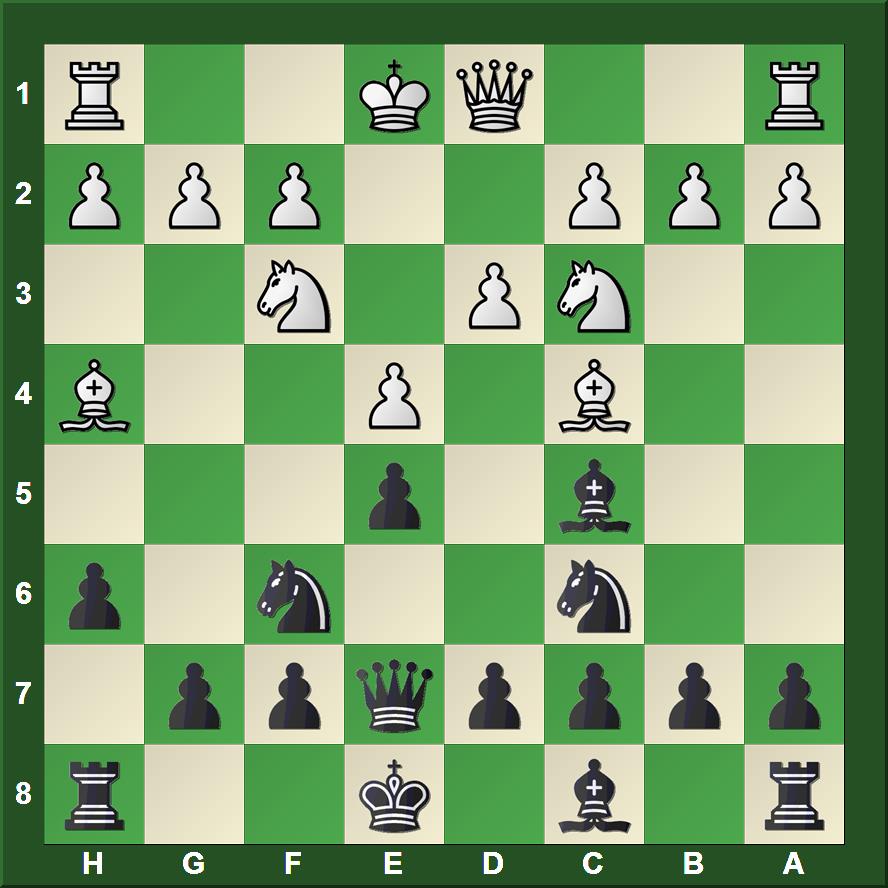
The first game was not particularly eventful. Although Carlsen managed to create weaknesses in Karjakin's pawn structure, the challenger managed to hold the position without too much pain. Looking at the final moves from my position as a class player, however, I did not know at a glance whether swapping the last pair of minor pieces could give either player an advantage in the pawn ending.
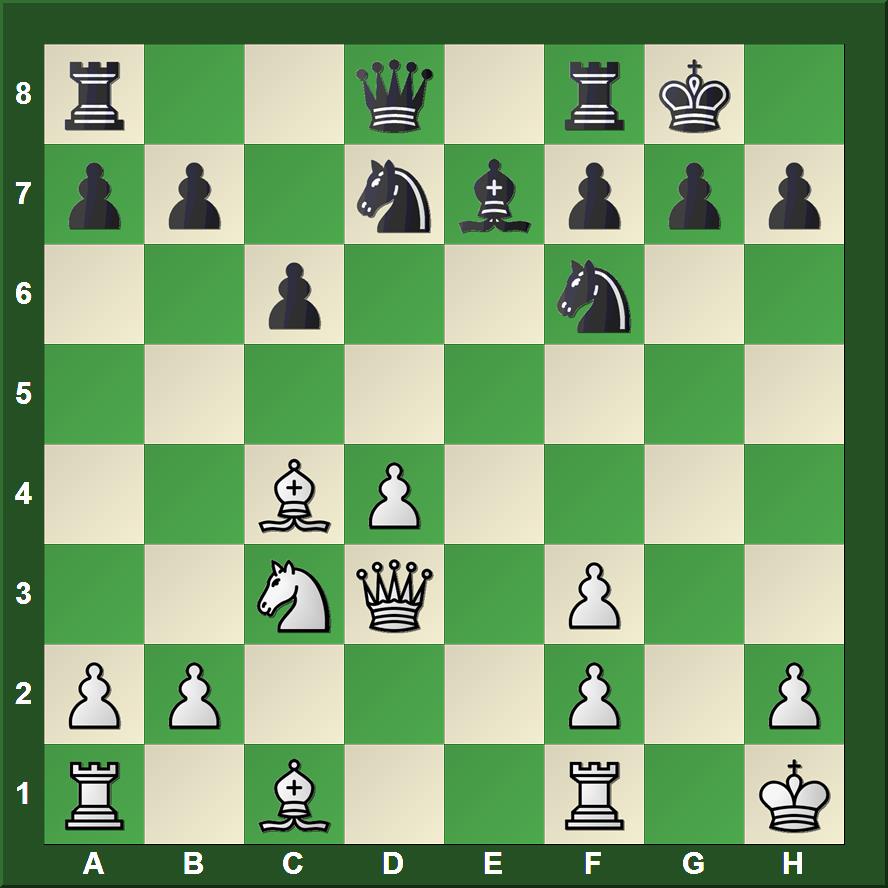
Black to move
After 40.Nd4+
The game concluded 40...Kd6 41.Nb5+ Kd7 42.Nd4 Kd6 and a draw was agreed due to repetition assured.

Had Karjakin played 40...Bxd4, would the game be drawn as well? Grandmasters probably understand the resulting pawn position at a glance, but many other chess players could do well to play it out against a friend or computer.

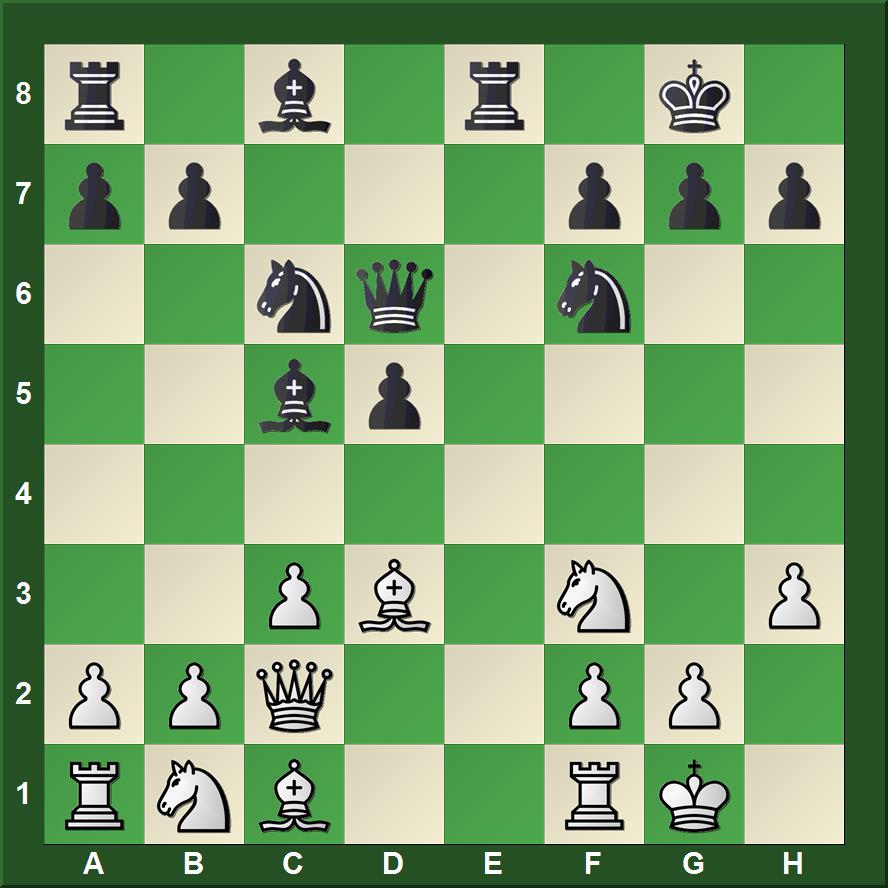
Carlsen's play with Black in game two deprived Karjakin of any real chance for an advantage.

Ruslan Ponomariov, who wrote the annotations to the first two games for ChessBase, thought that Carlsen could have presented Karjakin with a tactical problem to solve with a different move 26, but Karjakin probably would have seen the trick clearly.

Black to move
After 26.b4
Carlsen played 26...Re6 and the game was drawn on move 33. Ponomariov thought that 26...c5 27.Nxb5 cxb4 28.Nd6 Re6 29.Nxc8 Rxa6 might lead to complexities.

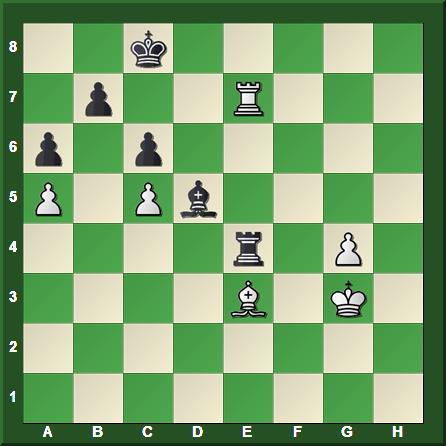
In the third game, Carlsen secured an advantage and then pressed hard for a win. The ending generated a lot of interest around the world. Yasser Seirawan was at a dinner in Saint Louis, where he joined Viswanathan Anand, Hikaru Nakamura, Veselin Topalov, and Fabiano Caruana following the game on Caruana's smartphone. Seirawan's annotations for ChessBase presented a drawing opportunity missed by Karjakin from this position.
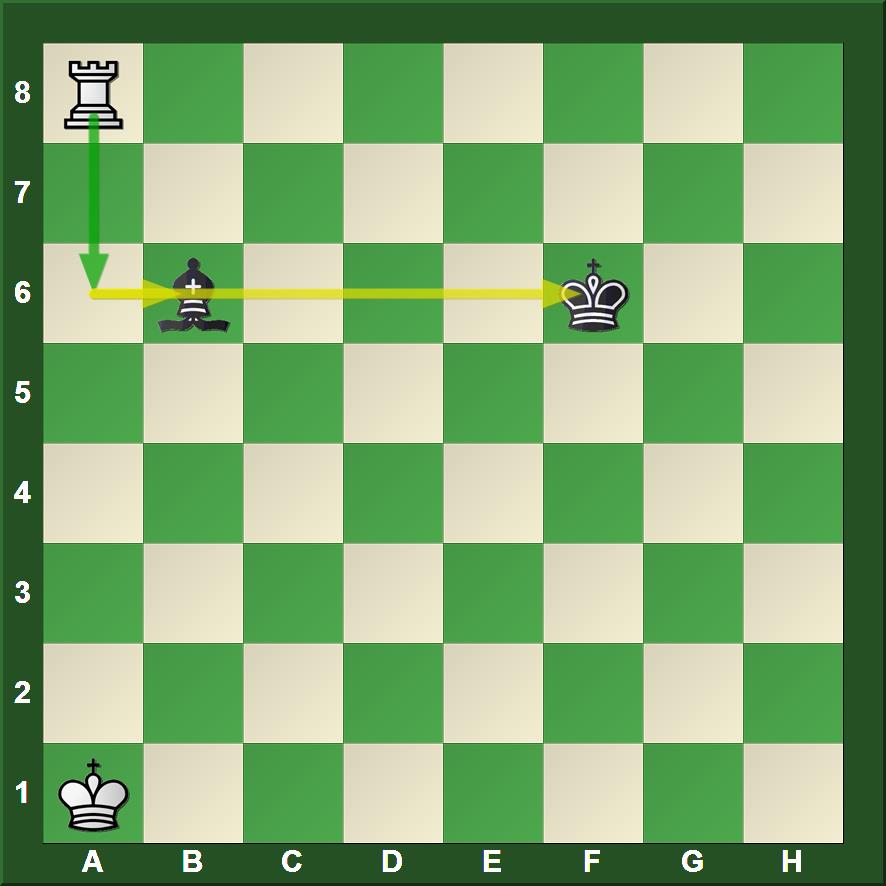
Black to move
After 70.Nc6
The game was drawn after 70...Kxf5 71.Na5 Rh1 72.Rb7? (72.Rf7+ seems to be winning) 72...Ra1! 73.Rb5+ Kf4! 74.Rxb4+ Kg3 75.Rg4+ Kf2 76.Nc4 h3 77.Rh4 Kg3 78.Rg4+ Kf2.

Seirawan's analysis, presenting the ideas of four other Grandmasters who "out-rated" him, after 70...Rc3!! is worth checking out at the link. Credit Anand for convincing the others that Karjakin could hold.

Chess fans following the game with the aid of engine analysis quickly spotted Carlsen's decisive error as he was pressing for a win in game four. However, Carlsen thought the line he played was winning. It took many more moves before Carlsen's winning ideas had been proven illusions.

Black to move
After 45.Nd1
How many humans could have found 45...Be6 and then had the ability to convert against Karjakin's defensive efforts? Carlsen played 45...f4, gaining a secure passed pawn on the kingside that left him plenty of time to penetrate with his king on the queenside. Many times during the next fifty moves, Karjakin had only one piece that could move without his position collapsing. Sometimes his king had to move. Other times his knight could move, and often only the bishop could. He was very close to zugzwang, but not quite.

Karjakin was slightly better in game five and spent a lot of time in this position, which my advanced students were watching on the demo board at chess club while it was taking place.

Black to move
After 42.hxg4
Karjakin's pawn sacrifice, 42...d4!, brought pressure against the White king. Carlsen returned the sacrifice two moves later and managed a draw.

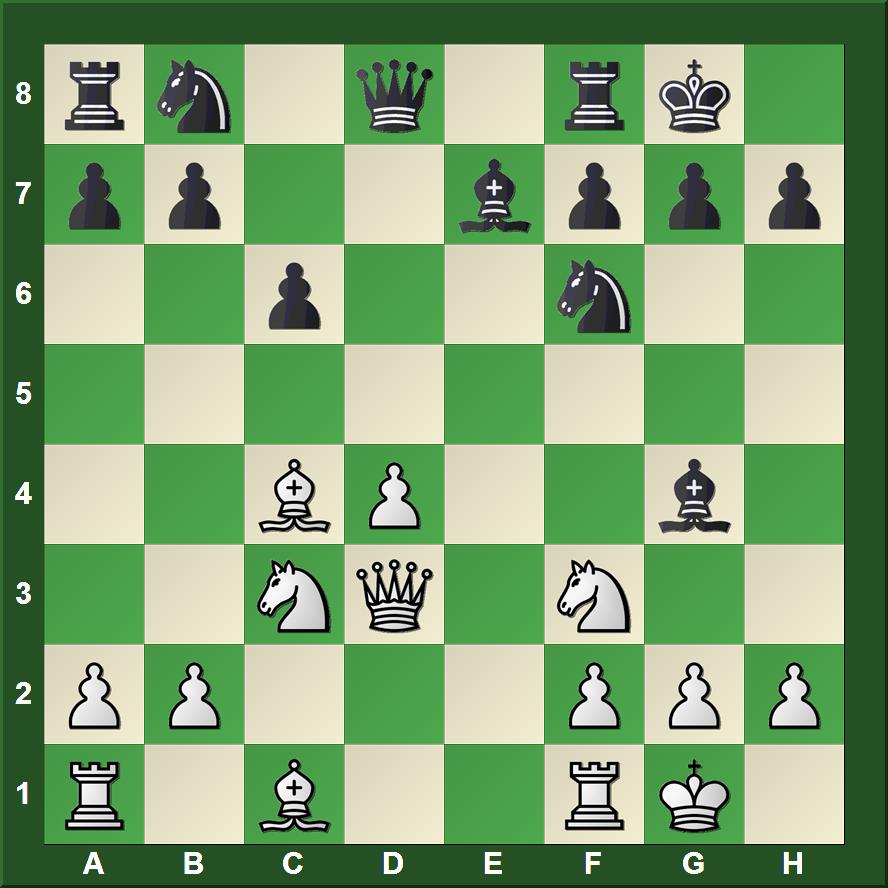
Gmae six was the least interesting game, except to those who seek to understand the Marshall Gambit and its variants when Black needs a draw against the Spanish. In the annotations for ChessBase, Tiger Hillarp Persson points out Karjakin's method and the computer's method of securing a clear draw from this position as White.

White to move
After 20...Rfe8
For game seven, Karjakin switched to 1.d4 but made no progress. Already at move 15, he needed to secure equality.

White to move
After 15...O-O
16.Ba3 forces material off the board. Karjakin ended up with an ending in which he was a pawn up, but had no chance to fight for a win.

After failing to get an advantage in the two shortest games of the match, and his two consecutive Whites, Karjakin explained, "it is better to play well than to play with White." In game eight, he broke the historic run of draws (the longest in a world championship match sine 1995), winning with the Black pieces.

Both players made errors in the time scramble just before move 40. Carlsen made a bad move in a bad position and then Karjakin missed the strongest continuation. Play went on into another hour.

White to move
After 48.Nd3
It is easy for a computer, and for a human looking at computer evaluations, to understand where White needs to place his queen in such a position. Perhaps the queen is where she belongs and something else should move. For human players, however, it is very difficult to find the right move. World Champion Magnus Carlsen played 49.Qa5? and Karjakin found a way to bring home the full point.

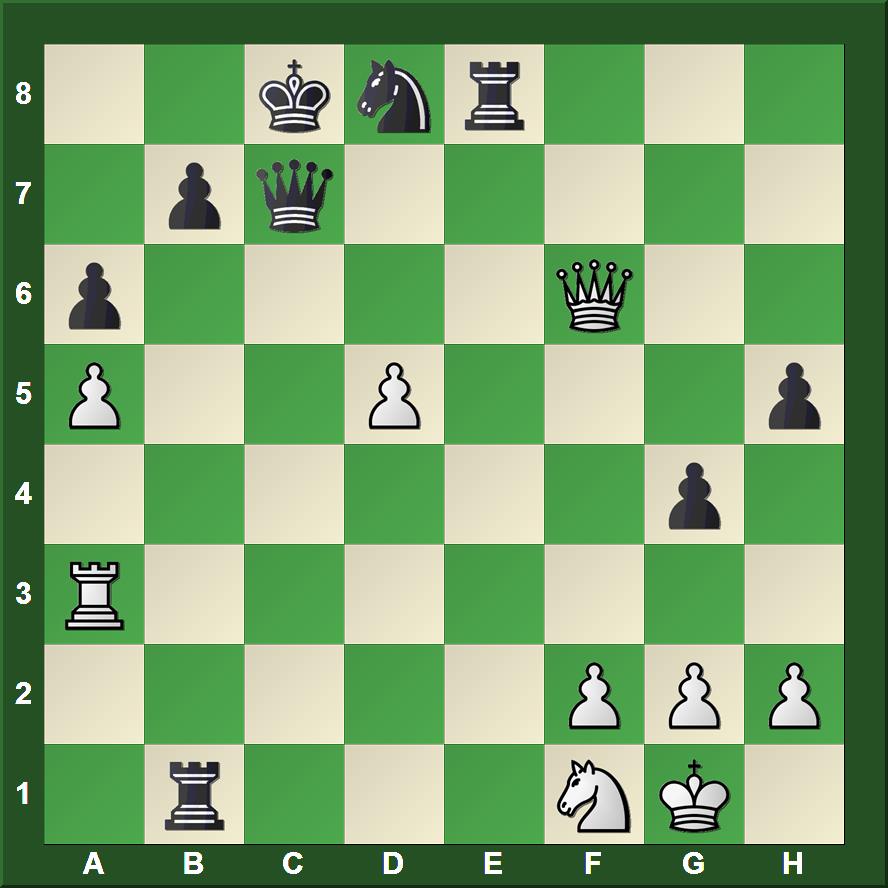
In the ninth game, Sergey Karjakin might have had a chance to put Carlsen away and gain the upper hand in the match.

White to move
After 38...Ne7
Karjakin thought for a long time, finally choosing 39.Bxf7+. Commentators favor 39.Qb3. Neither move has consequences that are clear to human players.

In the tenth game, Karjakin missed a forced draw early in the game and then suffered a long time.

Black to move
After 20.Nd2
How many players can find a draw here without engine assistance?

Karjakin finally cracked after defending a difficult endgame for many hours, allowing Carlsen to even the score.

18 November 2016

Beating the Italian

Last night, I finished with a perfect 3-0 to win my section of the Turkey Quads. I had not played in this event since 2011, and then it started a nice run of wins (see "Eleven Consecutive Wins!"). That run propelled me to my lifetime peak USCF rating of 1982, so this year's success in the Turkey Quads could be a good omen. However, I don't believe in omens. I do believe in training. My approach to chess training has been a little more serious since the Eastern Washington Open, my fourth consecutive tournament that led to a rating drop.

In reply to Todd Bryant's challenge (see comments on "Good Blitz, Bad Blitz"), these annotations were produced without reference to databases and engine analysis, except for limited use of the Chess Openings app on my iPhone during the postgame analysis, confirming that my sixth move was unusual.

van Heemstede Obelt,Walter (1600) -- Stripes,James (1750) [C50]
Turkey Quads Spokane (3), 17.11.2016

1.e4 e5

Everyone in Spokane knows that I play the French, but I don't always.

2.Nf3 Nc6

I considered 2...Nf6 for about five seconds, as I'm playing the Petroff in a correspondence game right now after having won in twenty moves on the White side against the same opponent.

3.Bc4 Bc5

3...Nf6 is too risky for me with the clock running. I believe that Black is objectively fine against the Fried Liver Attack, but that in practical play White has a clear edge.

4.d3 Nf6

I thought that I would castle next move.

I considered 4...h6, but did not seriously calculate 5.Nxe5 Nxe5 6.d4 Bd6

 (6...Bxd4 7.Qxd4 Nxc4 8.Qxg7 Qf6 9.Qg3)

7.dxe5 Bxe5 8.Qh5 Qf6

5.Bg5 h6

I remembered some Paul Morphy games where he delayed castling and threw his pawns and better coordinated pieces at the enemy king.

6.Bh4 Qe7?

This move appears to be unusual, or at least my opponent thought so after the game, and the Chess Openings app on my phone confirmed his hunch.

a) 6...d6 seems simple enough.
b) 6...Nd4? invites 7.Bxf7+ Kf8 (7...Kxf7 8.Nxe5+) 8.Nxe5 with a clear advantage for White.
c) 6...g5 7.Nxg5 frightened me 7...hxg5 8.Bxg5.

7.Nc3

And now I thought for ten minutes, feeling that I had given up a little too much already. How am I going to get a playable game? I decided that I needed to push my kingside pawns and be prepared to castle long. Would an open b-file prove useful to my opponent? I decided that he could not organize forces there fast enough to balance what I hoped to accomplish on the kingside.

Black to move

7...Bb4

7...g5 looks even worse than before 8.Nxg5 hxg5 9.Bxg5 with the idea 10.Nd5.

8.a3 Bxc3+ 9.bxc3 Nd8?!

The knight is headed to f4, but maybe 9...d6 is better.

10.Nd2

10.d4 challenged Black's effort to reposition his knight. 10...d6

(10...exd4 11.cxd4 If my students were shown this position and told it was a Morphy game, they would say that Morphy has White. Black is clearly underdeveloped, as were many of Morphy's opponents.)

11.d5 Bg4 12.Qd3 holds little promise for Black.

10...Ne6 11.0–0

11.Bxe6 Qxe6 12.0–0 g5 13.Bg3 d6 White's pieces are playing; Black's are watching.

Black to move

11...d6

I was thinking that either White's f-pawn of his or h-pawn would move after I drove the bishop back. I wanted to be able to sacrifice my bishop on h3 if he pushed that pawn.

12.Bb3 Nf4 13.Nc4 g5 14.Bg3 h5 15.f3

I did not work out all the details after 15.h3 but thought that 15...Bxh3 was at least worth considering. 16.gxh3 Nxh3+ 17.Kh1

(17.Kh2 h4)

17...h4 18.Bh2 g4 19.Ne3

(19.Rg1 Nxf2+)

19...g3 20.Bg1 g2+ 21.Kxg2 Nf4+ 22.Kh1 Qd7.

15...h4 16.Be1

16.Bf2 g4 17.Be3

(17.Ne3 helps me 17...g3 18.Be1 gxh2+ 19.Kh1 (19.Kxh2 h3 20.g3 Ng2 21.Qe2 Nh5 22.Nxg2 hxg2 23.Kxg2 Bh3+ 24.Kxh3 Nf4+ is obviously not forced at every turn, but serves to reveal that Black can temporarily sacrifice material and earn a return on the investment)

19...h3 20.g3 N6h5 21.gxf4 exf4 also looks good for Black.

16...g4 17.Ne3

Here I again thought for a long time. I observed that I had not yet sacrificed anything and decided to give my opponent something else to think about in addition to my kingside attack.

17...c6

Walter thought for a long time here, and while he was thinking I discovered that my last move sacrificed a pawn. Then, I began looking for ways to get some use from the sacrifice.

I considered 17...g3 but was not convinced that I had anything after 18.h3 Nxh3+ 19.gxh3 Bxh3 looks good for Black, but this position was not clear in my head during the game.

18.fxg4

Black to move

18...h3 19.Rxf4 

This move caught me by surprise, and I think it was a mistake.

I expected 19.g3 Ng2 20.Nxg2 hxg2 21.Kxg2?

(After the game, we looked at 21.Rf2 Nxg4 22.Rxf7 concluding that White was winning)

21...Bxg4 22.Qd2 Bh3+ and Black seems better.

19...exf4 20.Nf5

I'm looking for the trap--White's reason for sacrificing the exchange, and do not see it.

20...Bxf5 21.exf5 0–0–0 22.Bf2

With this move, White's idea becomes clear.

Black to move

22...Rdg8 

I think that I have a clear advantage now.

23.Bd4 Rxg4 24.Qxg4

I saw this possibility, but was happy that if my opponent went for the two rooks for the queen, I would have a smother mate.

24.Bxf6 Rxg2+ 25.Kf1 Qxf6 seemed the alternative.

24...Nxg4 25.Bxh8 Qe3+

Now I discovered to my horror that my own pawn on h3 prevents the smother mate. Clearly, even a win reveals plenty of room for improving my play when I overlook such obvious problems with my plan. Pattern recognition in the absence of concrete analysis is a worthless skill.

26.Kh1

Black to move

hxg2+

I thought that I still had a checkmate by force here, and do, but not the checkmate that I imagined.

26...Nf2+! 27.Kg1 Somehow I missed 27...Nd1+ 28.Kh1 Qe1#.

27.Kxg2 Qf2+ 28.Kh3 Nxh2

28...Qxh2+, which I had planned, loses the knight.

0–1

Walter resigned as checkmate can be delayed, but not prevented. 29.Be6+ fxe6 30.Rg1 Qxg1 31.Kh4 Qg4#.

16 November 2016

Karjakin -- Carlsen Match

Judit Polgar's commentary during the World Chess Championship, currently taking place in New York City, has been terrific! During game three, she assured her viewers that the game was likely to end in a draw, then later was quite certain that Magnus Carlsen would win, and then again that Sergey Karjakin could hold the draw. She seemed a little skeptical of her own predictive skill during game four. Through it all, her commentary offers clear explanations of general principles and stellar concrete analysis of the position on the board. It is also entertaining.

All four games so far have been draws, but they have been hard fought. In game three, it seemed that Carlsen had a clear advantage, but Karjakin defended well.

White to move

Carlsen played 72.Rb7, which Yasser Seirawan asserts in his annotations for ChessBase was the blunder that let Karjakin save the game. Ironically, most beginners would play the correct move without thinking, but Carlsen's move looks very good to experienced players. When White's b-pawn starts rolling, Black has difficulties. However, Black's rook is able to threaten the knight and pawn on the queenside, while also threatening to assist the h-pawn's run to promotion. As Seirawan points out, there is also a checkmate threat if the White king becomes greedy.

The manner in which Carlsen let Karjakin off the hook in game four is even more instructive.

Black to move

Carlsen played 45...f4. Karjakin was quite clear in the post-game interview in the hallway after the game that this move produced the draw. However, a supported passed pawn on one side of the board and serious pawn weaknesses for the opponent on the other are two factors that are nearly always decisive. Carlsen thought they would be, but after the game described his thinking as "sloppy".

45...Be6 increases the pressure on White's position. The defender wants simplifications. When attacking, it is often best to present as many problems to your opponent as possible. Of course, most players would make Carlsen's move in a heartbeat. How many would be able to defend as accuirately as Karjakin from the White side?

Dorian Rogozenco's annotations for ChessBase are worth a look.

This game was drawn on move 94, well short of the record for longest WCC game, Korchnoi -- Karpov 1978, game 5 (124 moves).

During the game three commentary, Polgar informed viewers that Cartlsen explained his match strategy to her: he will punch Karjakin until he finds the blow that knocks him down. If Karjakin keeps making the errors that give Carlsen a clear advantage, this decisive punch will come soon.

15 November 2016

The Drawn Game

Chess games do not always end with a winner. In fact, as players become stronger, draws become more likely. In the World Championship match that is taking place right now in New York City, the first three games ended in a draw. Game four began about the time that this post was published.* Game three was a hard-fought battle with small mistakes by both players. The World Champion had good chances to win, but these were not easy to find and his opponent, the challenger, proved resilient in defense.

The most common ways that a chess game might be drawn is the lesson of the week for my beginning students. Examples from practical play are provided as well.

In a chess tournament, players get one point for a win and zero for a loss. When the game ends in a draw, the players split the point for the game: each gets ½ point.

How do games end in a draw?

There are several ways that a game can end in a draw. These are the most common.

1. Agreement

Players may agree to a draw, usually because they realize that neither has a reasonable chance of winning. Draw by agreement is rare among scholastic players, as it should be.

2. Stalemate

When the player on move is not in check and has no legal move, the game ends in stalemate.

Black is in stalemate in this position from a scholastic tournament.

Black to move

Note that if it were White's move, Qg6# is checkmate. This sort of stalemate is far too common in youth events when children do not know possess elementary checkmate skills (see "Cutting Off" for one important aspect of these skills that contains links to other useful posts).

A game that I played this morning had the possibility of ending in stalemate, but ended drawn by agreement instead.

White to move

Black has just promoted a pawn to a new queen, but White gets rids of the queen quickly.

58.Nc3+ Kb2 59.Nxb1 Kxb1 60.Kc3 Ka2

Had Black played 60...a4, I would have played 61.Kb4 and taken the pawn on the next move. That would result in a draw by insufficient material (see below).

61.Kc2 a4 62.Kc1 Ka1 63.Kc2 a3 64.Kc1 Ka2 65.Kc2

I offered a draw here, which my opponent accepted. Had Black played 65...a2, Kc2 would leave Black with no legal moves.

A common error that beginners make is thinking it is stalemate because a king cannot move without considering the other pieces on the board. For stalemate to occur, a player must have no legal moves. Sometimes the only way to win a position is to deprive the enemy king of movement in order to force another piece to move.

In the next position from Barcza – Rethy, 1953, it is not stalemate. The Black king has no legal moves, but the Black pawn does.

Black to move

Black must play 1...c2. White then responds 2.Nc6. Then Black must play 2...c1 and promote the pawn. Because White's last move shield the king from check should Black choose a queen or rook, 3.Nb6# is possible.

3. Repetition

When the same position (all the pieces on the board) has occurred three times with the same player to move each time, a draw may be claimed.

In the example from my game this morning above, my opponent and I could have shuffled our kings back and forth until we had reached the same position three times, then either would have been able to claim a draw.

4. 50-move Rule

When 50 moves have passed with neither a capture nor a pawn move, the player on move may claim a draw. White and Black move = one move.

"Max Judd's Draw Claim" describes an entertaining game where a draw was claimed by this rule, but was ultimately rejected. The rule has changed a little bit over the years, and it was somewhat confusing at the time this game was played.

5. Insufficient Material

If neither player possesses enough material to deliver checkmate, the game is drawn. Two lone kings, or a lone king against a king and minor piece (bishop or knight) are insufficient material.


Learning from the Championship Match

The advanced students played chess while also watching game 5 of the World Chess Championship on the demo board. As the game concluded while we had still ten minutes remaining, we quickly examined why the final position forces a draw.

White to move

An opposite colored bishop endgame results from the forced trade of rooks. As Black's bishop guards the promotion square for White's passed pawn, neither side has any reasonable hopes of progress.

*Game four also was drawn after 94 moves.

14 November 2016

Good Blitz, Bad Blitz

Blitz chess is popular and fun. It also can be useful as a training tool. On the other hand, blitz can reinforce bad habits by cultivating sloppy thinking and rewarding reckless play. Blitz chess is characterized by blunders.

Today, while watching game three of the World Championship between challenger Sergey Karjakin and reigning World Champion Magnus Carlsen, I played a few blitz games on Chess.com. Two of my wins featured successful mating attacks. These were successful because my opponents' errors matched my own.

Internet Opponent (1853) -- Stripes,J (1883) [A22]
Live Chess Chess.com, 14.11.2016

Black to move

11...Bf5+ 12.Kb3 Na5+ 13.Ka4?

13.Kb4 minimalizes Black's advantage

13...b6–+ 14.b4 Nb7

14...Bc2#

If I cannot find checkmate in one, maybe I should find a new hobby.

15.Ba6?

15.Kb3 and White's king is safe.

Black to move

15...Kb8?

15...Bc2+ 16.Kb5 Rd5+ 17.Kc6 Ba4+ 18.Bb5 Bxb5#.

16.Bb2?

16.Kb3 again leaves Black with a minimal advantage.

16...Bc2+

Finally, I find my way.

17.Kb5 Nd6+ 18.Kc6 Be4# 0–1

This flawed miniature could be useful instruction for beginners learning checkmate patterns, but it is nothing to brag about for the winner. Both players seem overrated.

Stripes,J (1899) -- Internet Opponent (1946) [B32]
Live Chess Chess.com, 14.11.2016

White to move

17.Rxf7!

This beautiful strike suggests that I see the checkmate in six, or at least that I recognize a familiar pattern. I have certainly seen many chess problems with sacrifices of a rook on f7 in similar positions.

17...Kxf7 18.Qxh7+ Ke6 19.Qxg6+ Kd7

19...Kxe5 20.Re1+ Qe3 21.Rxe3+ Kf4 22.Qg3#.

20.Bf5+

My move is clearly winning, but why not deliver checkmate immediately: 20.Qd6#. I had about two minutes left in a three minute game. There was no reason not to slow down and find the checkmate. Instead, I'm playing by instinct, making moves that might be good in similar positions. That is the sort of poor thinking that blitz cultivates.

20...Kd8 21.Qf6+??

21.Qd6+ finishes things 21...Bd7 22.Qxd7#.

Black to move

21...Re7??

21...Kc7 22.Qf7+ Kd8 23.Qf6+ and a draw by repetition is White's best option.

22.Qf8+ Kc7 23.Qxe7+ Kb8 24.Qd6+

Black to move

24...Qc7

24...Kb7 25.e6 Rb8 26.Re1+-.

25.Rb1+ Bb7 26.Qf8+ 1–0

White delivers checkmate next move, so Black resigned.

10 November 2016

Pawns

Lesson of the Week

The after-school chess club that I run at a small private school in my city is divided into two groups--beginning and advanced. Acceptance into the advanced group requires participation in last year's scholastic tournaments or my permission. The beginning group includes children who want to learn chess and may begin knowing nothing about the game.

The lesson for both groups this week came from the same game, a blitz game that I played online Monday morning. For the beginning group, there was a lesson about trading into a pawn ending that was winning as well as basic rules concerning pawn promotion. For the advanced students, I focused on some elementary notions about imbalances. I drew their attention to a quote that I have on the wall in the club room.
[E]ach chess move begins in the head. If you attach importance to playing a good game of chess, you must first of all learn how to think properly.
Alexander Bangiev
Although this was a blitz game in which the players had minimal time for thinking, the positional ideas that are part of this week's lessons were part of my thought process during the game. Blitz games between strong class players offer excellent training materials for young children who are just beginning, as well as experienced tournament players with ratings up to 1200 Elo or even higher..

Internet Opponent (1814) -- Stripes,J (1891) [A46]
Live Chess Chess.com, 08.11.2016

Starting position for advanced students.

Black to move

Students come into the room, ask who has the move, and then start suggesting moves. I would not entertain move suggestions until the students could describe certain elements of the position. I wanted them to observe imbalances in the pawn structure, material, and space.

Both players have their rooks on half-open files. Black has a central and kingside pawn majority. White has a queenside majority. Black's king and rooks are prepared for action on the queenside and prevent most White activity there. White might be able to generate some play on the kingside.

21...a5

My move was designed to restrain White's pawns and make White's bishop an impotent piece. I want to put all or most of my pawns on dark squares.

Stockfish favors 21...Rxd3, which I considered during the game. 22.cxd3 Rc3 Although the engine says this is the clearest winning line, I know that pure rook and pawn endings give the weaker side excellent drawing chances.

22.f3

I suggested to the students that 22.f4 might be better as it does more to mobilize White's rook and helps restrain Black's central pawn advance.

22.Bxh7 does not help White's cause. 22...f5 attempts to trap the bishop. Play might proceed 23.g4 Rxc2 24.gxf5 Rc1 25.Kf1 Rxe1+ 26.Kxe1 Rc3 27.fxe6+ Kxe6 28.Kd2 Rxb3 29.Bc2 Rh3. I showed the students 22...f5, but not the rest of that line.

22...h6 23.Kf2 Kd6 24.Re2 e5 25.dxe5+ fxe5 26.Ke1 Re8 27.Kd2 Rc7 28.Bb5 Ree7

White to move

29.c4 

This move weakens b3, which Black now decides to go after with his king.

29.Bd3 might be better, as Black plans e5-e4.

29...Rc5 30.Kc3

30.cxd5 Rxd5+ 31.Kc3 Rd4

30...e4

This move reveals stubborn adherence to a plan without reconsidering after the position has changed. The plan is sufficient, however.

30...d4+ is better.

31.Kd4 b6

I was afraid of dropping the rook on c5. However, 31...exf3 32.Rxe7 Kxe7 33.Kxc5 fxg2 wins easily.

32.fxe4

32.f4 improved White's chances to hold on.

32...dxe4

32...Rxe4+ is simpler 33.Rxe4 dxe4 34.Kxe4 Rh5 35.h3 Kc5 going after b3.

33.Rxe4

White might have fought more stubbornly with 33.Ke3 Rf5 34.Rb2 Kc5.

33...Rxe4+ 34.Kxe4 Rg5

White to move

Observe the success of Black's plan to render the bishop impotent. From here, Black's plan is now to gobble some pawns with the king and then exchange rook for bishop to reach an easily winning pawn ending.

35.g3 Kc5 36.Bd7 Kb4 37.Kf4 Kxb3 38.h4

38.Bb5 is met by 38...Rxb5 39.cxb5 Kxa4 with an easy ending.

38...Rc5 39.Be6 Kxa4

Black could have played 39...Rxc4+ 40.Bxc4+ Kxc4 41.g4 b5 42.axb5 Kxb5. However, this line requires a little bit of calculation.

40.g4 Kb4 41.g5 hxg5+ 42.hxg5

Starting position for beginner's lesson.

Black to move

We discussed the rules of pawn promotion and I answered questions like, "What do you use for a second queen?" Then focused the students' attention on the possibilities for creating a pawn race that Black could win easily.

42...Rxc4+

My move is good enough and simple.

42...a4 is best 43.Bf5 a3 44.Bb1 Kb3.

43.Bxc4 Kxc4 44.Kf5 a4 45.Kg6 a3 46.Kxg7 a2 47.Kh7 a1Q 48.g6

Black to move 

Black's extra pawn makes it possible to give up the new queen for White's remaining pawn. Without Black's b-pawn, Black would still be winning in this position, but that is a lesson for another day.

48...b5 0–1

04 November 2016

Useful Knowledge

How do chess players develop their skill?

There is no doubt that strengthening tactics--pattern recognition and calculation--is essential. Learning openings and endgames helps also.

Studying classic games is both enjoyable and productive. Paul Morphy's games help teach the fundamental principles of development in the opening--mobilization of forces, time, vulnerability, coordination of forces. His games also offer an abundance of tactical positions where pattern recognition and calculation skills can be honed through proper training.

Reading Bobby Fischer, My 60 Memorable Games may drill into the reader's memory his famous line, "tactics flow from a positionally superior game," and also may set into the memory the knight sacrifice on h7 to rip open the pawn shield in front of Black's king that was the context of that remark. Another sacrificial attack that should be familiar to most chess players was played in Rotlewi -- Rubinstein 1907. It appears in many books on tactics. I have seen the critical position during tactics training both on Chess Tempo and while using Chess.com's Tactics Trainer. The patterns in this game inspired Vishy Anand in his brilliant miniature against Levon Aronian at the 2013 Tata Steel Chess Tournament.

As a devotee of the French Defense, I have spent many hours looking for ways to secure an advantage, or at least a playable game with imbalances, against the Exchange variation. Years ago on this blog, I declared my contempt for the Exchange variation, calling it "cowardly" (see "French Perfume"). Even so, I have lost a handful of games over-the-board against the Exchange French and have lost far more than a few in online play. Still, I have found some success in online play, especially blitz, drawing inspiration from Victor Korchnoi's fine miniature against Stefano Tatai.

Tatai,Stefano (2455) -- Kortschnoj,Viktor (2665) [C01]
Beersheba (6), 1978

1.e4 e6 2.d4 d5 3.exd5 exd5 4.Bd3 c5 5.Nf3 Nc6 6.Qe2+ Be7 7.dxc5 Nf6 8.h3 0–0 9.0–0 Bxc5 10.c3 Re8 11.Qc2 Qd6

White to move

12.Nbd2 Qg3 13.Bf5 Re2 14.Nd4 Nxd4 0–1

Whan I have the Black side of the Exchange French, having my queen and two minor pieces arranged on c5, c6, and d6 as in the diagram above fills me with confidence, especially when White voluntarily weakens the g3 square with h2-h3 (see "Find the Blow").

Last night in the first round of the Turkey Quads at the Spokane Chess Club, this game was brought back into my memory.

There was a bit of irony.

I had White and played the Exchange variation via an anti-French line with 2.c4. Careful analysis of the game after it concluded, revealed that my attention to tactical opportunities for my opponent wavered. Indeed, as one might expect from the French Exchange, White was worse until a tactical error by Black. At this point, the lessons from Tatai -- Korchnoi served me well.

Stripes,James (1750) -- Griffin,David (1606) [C01]
Turkey Quads Spokane (1), 03.11.2016

1.e4 e6 2.c4 d5 3.exd5 exd5 4.d4 c6

4...Nf6 5.Nc3 Be7, or 5...Bb4 is the usual manner of meeting this line with equality for Black.

5.Nf3

5.Nc3 Bb4 6.Nf3 is a more accurate move order, in my opinion.

5...Nf6 6.Be2

6.Nc3 is more flexible, as the bishop might go to d3 or even c4 in one move.

a) 6...Be7 7.Bd3 0–0 8.h3 dxc4 9.Bxc4 Nbd7 10.0–0
b) 6...Bd6 7.Bd3 0–0 8.0–0 dxc4 9.Bxc4 Bg4 10.h3 Bh5

6...Be7

6...Bb4+ 7.Nc3 Ne4 8.Bd2 Bxc3 9.bxc3 0–0 10.0–0 Be6 and White won in 40 moves, Vegh,E (2302)--Gonda,L (2524), Zalakaros 2013.

7.Nc3 0–0 8.0–0 dxc4

Black seizes the opportunity to give White an isolated queen pawn.

9.Bxc4 Bg4 10.Qd3?!

Black to move 

10.Re1 is better, as it protects against Bxf3 and Qxd4 because Black must first protect e7.

With the move that I played, the queen can become vulnerable on this square.

Even so, I enjoyed the irony of the resemblance of my central pieces and d-pawn to Black's in Tatai -- Korchnoi 1978, but there are several aspects of the position that differ. This move was made after four minutes thought and was the first time that I moved in more than half a minute.

10...Bxf3 11.gxf3N

Here I thought for five minutes. Facing a choice between ruined pawns or being a pawn down, I opted for ruined pawns in hopes that I could find use for the g-file.

The alternative appears in a game between two players just over 2000 Elo: 11.Qxf3 Qxd4 12.Qe2 Re8 13.Bg5 Qg4 14.Qxg4 Nxg4 15.Rfe1 Kf8 and drawn after 54 moves Janiszyn,E (2007)--Chmielinska,A (2065), Zakopane 2001.

11...Nbd7 12.Kh1?

I am thinking about my long-term tactical hopes, but have not considered the tactical resources offered to my opponent.

12.a3 was something that I judged too slow because I was oblivious to Black's tactical opportunity. However, it removes Black's tactical opportunity.

Black to move

12...Re8

12...b5! alerts White to the errors of his plan, although neither player seems aware 13.Bb3 Nc5 14.Qd1 Nxb3 15.axb3 and White's pawns can hardly be worse.

12...Nb6 was a move that I thought I was prepared to meet 13.Bb3 Nfd5 14.Rg1 Re8 15.Bh6 Bf8.

13.Be3

I played a waiting move. I wanted to play Rg1, but thought that it might matter whether Black plays Bf8 or Nf8

13...Nf8

13...b5 remains possible 14.Bb3 Nc5 15.Qf5 Nxb3 16.axb3 and Black has good prospects to win.

14.Rad1

I was pleased with myself with this move because it prepares d4-d5, something that I wanted Black to think about.

14...Qc7 15.Rg1= Ng6?

15...b5 16.Bb3

15...Rad8 would seem to be the point of Qc7, but it permits a forcing line that might give White a slight edge. 16.Bh6 Ng6 17.Rxg6 hxg6 18.Qxg6 Bf8 19.Bxg7 Bxg7 20.Rg1 Nh5 21.Qxh5 Qf4.

White to move

16.Rxg6!

I had been hoping for this opportunity when I played 10.Qd3 and 11gxf3.

Now that it was here, I tried to see to the end before playing this move, spending twelve minutes analyzing. The remaining annotations and all the moves of the game follow my calculations during those twelve minutes, except where noted.

I considered 16.Bh6 gxh6 17.Rxg6+ hxg6 18.Qxg6+ Kh8 19.Qxh6+ and I have had similar positions with colors reversed and found little success.

16...hxg6 17.Qxg6 Bf8

17...Rf8 18.Bh6 Ne8 and things were blurry in my imagination, but it felt comfortable. 18...Nh5 19.Rg1 was my plan ( I did not foresee 19.Bxg7! Nxg7 20.Rg1+-).

17...Bd6 18.Rg1.

18.Rg1 Rxe3

I expected 18...Nd5 19.Nxd5 cxd5 20.Bxd5 and I thought White's game was comfortable as Black's problems remain.

19.fxe3 Rd8?

A bad move in a difficult position.

a) 19...Nd5 seemed necessary to me, when 20.Nxd5 seems to offer a clear advantage (I did not consider 20.Qh5), and then 20...cxd5 (20...fxg6 21.Nxc7+ is clearly better for White) 21.Bxd5 when I still have threats and have recovered the sacrificed material with interest. In addition, my sorry pawns are substantially improved.

b) 19...Ne8 was also possible when I planned 20.Ne4 with the idea Ng5 and Qh7#.

c) 19...b5 20.Bb3 Qe7 (20...Nd5 is similar to lines above 21.Nxd5 Qd6 22.Nf6+ Qxf6 23.Qxf6 b4 24.Bxf7+ Kh8 25.Qh4#).

20.Qxf6 1–0

David resigned. He is the tournament director of this event, which includes sixteen players in four quads. We are in Quad B.


03 November 2016

Tarrasch -- Schlechter 1894

[T]his game becomes an instructive example of how a minor advantage can be nursed and finally converted into a win.
Siegbert Tarrasch, Three Hundred Chess Games (1999 [1895])
Seigbert Tarrasch's first game against then twenty year old Carl Schlechter is an instructive positional game in which White uses greater space to build an attack against the king. He annotated the game for the final chapter of his Three Hundred Chess Games, originally published as Driehundert Schachpartien (1895). White's systematic destruction of all Black counter-play is the theme of a lesson that Jeremy Silman developed for the chess software Chess Mentor, and which is now available on Chess.com. Silman's lesson expands upon his discussion of this game in How to Reassess Your Chess, 3rd ed. (1993), 139-141.

Sabina Foisor also has created a YouTube video of the game, although her game score differs from that of the ChessBase database, Three Hundred Chess Games, and Silman. Nonetheless, her fifteen minute video is a good introduction to the players and to the main themes in this game.

Tarrasch,Siegbert -- Schlechter,Carl [C66]
DSB–09.Kongress Leipzig (1), 1894

1.e4 e5 2.Nf3 Nc6 3.Bb5 d6 4.d4 Bd7 5.Nc3 Nf6 6.0–0 Be7 7.Re1 Nxd4 8.Nxd4 exd4 9.Bxd7+

Black to move

9...Qxd7

9...Nxd7 Silman, How to Reassess Your Chess, and Foisor both point out that this move is now considered a better effort for Black to achieve equality.

10.Qxd4 0–0 11.b3 Rfe8 12.Bb2 Bf8 13.Rad1 Qc6 14.Rd3 Re6 15.Rde3 Rae8

White to move

The beginning of Silman's Chess Mentor lesson.

"Black has completed his development and the positions are almost symmetrical. White's attack seems to have reached a dead point. It is hard to see how White is going to increase his minor advantage" (Tarrasch, 348).

16.h3

Taking away g4 from Black's knight.

16...Qb6 17.Qd3 c6 18.Na4 Qc7 19.c4

The point of moving the knight to the rim was to secure d5 with this pawn push.

19...Nd7

19...a6 with the idea of b7-b5 would have been better (Foisor).

20.Kh1

Prepares to use the g-file for the heavy pieces and also steps away from any tactics along the a7-g1 diagonal.
This and the subsequent six moves are somewhat of a riddle to Black. White has a very specific plan, ... White must not allow Black to break out of the steadily increasing blockade by playing for access to c5. ... White's attacking plan is play the knight to f5 via c3-e2-d4, but to execute this plan he has to overcome a lot of difficulties.
Tarrasch, 349
Black to move

20...f6 21.Qc2

21.Qb1 was better.

21...Ne5 22.Nc3 Nf7

White to move

23.g4?

"The only bad move that White makes in this game" (Jeremy Silman, Chess Mentor).

23.Qb1 is Silman's recommendation.

23.Ne2 allows 23...f5, according to  Tarrasch.

Silman's Chess Mentor course offers a separate lesson looking at this position from the Black side.

Black to move

23...Qa5

Tarrasch gives the line 23...d5 24.exd5 Rxe3 25.Rxe3 Rxe3 26.fxe3 Qg3, which is the solution to Silman's exercise. However, Tarrasch suggests that the king's presence on h1 takes the sting out of this little combination. Silman, on the other hand, claims that Black equalizes.

24.Rd1 Qb6 25.h4!

25.Ne2 Ng5 "will attack the e-pawn and thus force the knight to return" (Tarrasch, 349).

25...Ne5 26.Rg3 Nf7 27.f3

"Before the knight can complete its journey, the e-pawn must be guarded. Now there is no way for Black to keep the knight from reaching its destination" (Tarrasch, 349).

27...Nh8 28.Ne2

White has plenty of time because Black's counterplay is dead.

Black to move

28...Qc7

28...Qf2?? 29.Bd4.

29.Rdg1

Here Foisor goes astray in her account of the game with Rgg1.

29...Qf7 30.Nd4 R6e7

"The Black pieces are crowded together like a flock of sheep with the wolf standing at the door ready to break inside" (Tarrasch, 349).

31.g5 fxg5 32.Rxg5 g6 33.Nf5

Black to move

33...Re5

33...Re6 34.Qc3 Re5 35.f4 Tarrasch.

34.f4 Rxf5 35.exf5 Bg7 36.fxg6 1–0

01 November 2016

Patterns of Contacts

Lesson of the Week

[A]ny tactical operation no matter how complex, can be described in terms of different combinations of contacts. ...to certain constellations of pawns, pieces or squares on the chess board.
Yuri Averbakh, Chess Tactics for Advanced Players (1992)
This week's lesson of the week includes only that for the beginning club. My advanced club does not meet this week due to the end of the first quarter and parent-teacher conferences. I introduced three terms that name relationships between the pieces--pin, fork, and skewer. Each was presented in a simple position where Black's pieces are vulnerable due to standing on the same rank. White's possession of a rook permits attacking both king and bishop in three different ways.

Fork

The rook is able to move to the sixth rank between the bishop and king. The king must move out of check, then the rook can capture the bishop. This is called a fork because the rook attacks two pieces in different directions.


Pin

The rook again moves to the sixth rank, but this time in a manner that prevents the bishop from moving. The bishop is pinned against the king.


Skewer

The rook moves to the sixth rank attacking the king with check. After the king moves, the bishop is exposed to the rook's hunger. The king is skewered like a piece of tofu ready for the grill.


After presenting these simple illustrations, I showed the students part of a game that I lost.

White to move

My opponent seized on the presence on my king and queen on the same file.

27.Rc3* Nc6

I threw away a knight in the futile effort to save the queen. Although it seemed like a good idea, White's additional tactics prevailed. This move was actually the game losing blunder.

28.dxc6 Ree1

I add a second rook to the one already pinning the knight.

29.cxb7+ Kxb7 30.Rxc7+ Kxc7 31.Qc3+ Kd6

White to move

32.Qc4

The problem with my knight sacrifice is revealed. The queen now defends the knight. Of course, I could trade the two rooks for the queen and knight, a gain of material, but that would leave me in a hopeless king and pawn ending. The alternatives are even worse, however.

In this game fragment, we see elementary pins at work in a complex position. If the young student learns these patterns through simple diagrams like the three above, he or she will develop the ability to see such contacts in more complex positions.


*27.Rc3 was an error. Although it seems like a simple and correct move. I could have gained the advantage with 27...Ree1. White had a better move that maintains equality, a fork. Can you spot it?